
Container Gardens
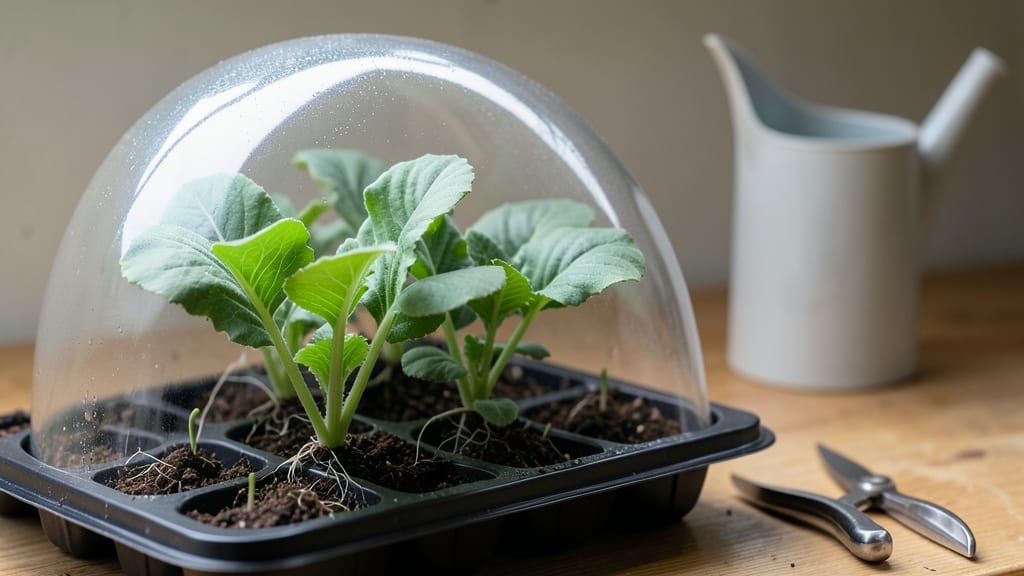
My first growing seeds kit turned a skeptical neighbor into a gardening addict—all within three weeks of tiny green sprouts breaking through the soil. 🌱 The kit comes with everything you need: biodegradable pots, pre-moistened soil, and seeds chosen to germinate fast, so you see results before motivation fades.
No guesswork about soil mixes or light needs—just follow the simple steps, and you’ll watch those first leaves unfurl right on your windowsill.
Most kits include 5-10 seeds of easy-to-grow flowers like marigolds, sunflowers, or zinnias, plus a small tray to hold moisture without drowning roots. The soil’s already mixed with nutrients, so you skip the shopping list and just add water.
My kit even came with a humidity dome to keep seeds cozy until they sprout—no fancy greenhouse needed. The whole setup costs less than a coffee date but delivers weeks of progress instead of just conversation.
By week three, you’ll be pinching off those first true leaves and dreaming of transplanting into the ground. The kit teaches you how to monitor moisture (too wet = mold; too dry = crunchy seeds) and when to give seedlings their first taste of sunlight.
Even if a few seeds flop, you’ll still end up with lush, blooming plants that prove gardening isn’t some mysterious art—it’s just science with a little patience.
Once you master the kit, you’ll graduate to bigger projects—like direct sowing or experimenting with heirloom varieties. But for now? This is the foolproof way to build confidence, avoid common mistakes, and fall in love with the whole messy, rewarding process. Ready to dig in?
📚 In This Guide
- What you need
- Instructions
- Tips and common mistakes
- Wrapping up and next steps
What you need
- ● Growing seeds kit (includes seeds, biodegradable pots, and soil pellets or starter cubes)
- ● Watering can or spray bottle (with a fine mist setting for gentle hydration)
- ● Sunlight access (a sunny windowsill or grow light for 6–8 hours daily)
- ● Room-temperature water (avoid cold water to prevent shocking the seeds)
- ● Patience & enthusiasm! (Your biggest tools are curiosity and care.)
- ● Grow light (LED or fluorescent, 12–16 hours/day if natural light is limited)
- ● Humidity dome or plastic wrap (to retain moisture while seeds germinate)
- ● Fertilizer (balanced, water-soluble) (once seedlings sprout, dilute to half-strength)
- ● Notebook or app (to track watering, sunlight, and growth progress)
- ● Decorative tray or saucer (to catch excess water and add flair to your setup)
Step-by-Step instructions for growing your beginner-friendly blooms
Here's how to transform your kit into a vibrant display of color in just three weeks.
🌱 Step 1: Prepare Your Growing Tray and Soil
Start by laying out the included growing tray on a flat, stable surface. The kit comes with pre-filled biodegradable pots—no need to add extra soil. If yours didn’t, fill each pot with the 2 cups of seed-starting mix from your kit until it reaches just below the rim. Gently press the soil down with your fingers to remove air pockets, but don’t compact it too tightly. You want it firm enough to support the seeds but still loose enough for roots to penetrate easily.
Run your finger along the edge of each pot to create a shallow groove around the inner wall. This helps prevent soil from splashing out when you water. Place the tray in a warm spot—65-75°F is ideal—until you’re ready to plant. If your home runs cooler, a sunny windowsill or a seedling heat mat will speed up germination.
🌱 Step 2: Plant the Seeds at the Right Depth
Open the seed packet and carefully count out 4 seeds—one for each pot in your kit. The packet will tell you the proper planting depth, but as a general rule, sow seeds at a depth equal to twice their diameter. For most beginner-friendly blooms, that’s about ¼ inch deep. Use your fingertip to make a small hole in the soil, drop in one seed, and cover it lightly with more soil from the kit.
Press down very gently around the seed to ensure good soil contact, but avoid burying it deeper than intended. Label each pot if your kit doesn’t have pre-marked varieties—this saves headaches later. Mist the soil surface with a spray bottle until it’s evenly damp, but not soggy. Overwatering now can drown seeds before they sprout.
💧 Step 3: Provide Warmth and Moisture for Germination
Cover the entire tray with the clear plastic dome included in your kit. This creates a humid microclimate that mimics the greenhouse conditions seeds love. Place the tray in a warm spot—above 65°F is critical for speedy germination. If your home runs cooler, a sunny windowsill or a seedling heat mat (set to 70-75°F) will help. You’ll see tiny sprouts in 5-10 days, depending on the variety.
Check the soil daily but resist the urge to water until you see condensation forming on the dome’s underside. That’s your signal the soil is moist enough. Once 50% of seeds have sprouted, remove the dome immediately—trapped humidity invites damping-off, a fungus that collapses seedlings overnight. From now on, water from the bottom by placing the tray in ½ inch of water for 10 minutes, then draining excess.
☀️ Step 4: Move to Bright Light and Encourage Strong Growth
As soon as the first true leaves appear—those are the second set after the initial cotyledons—move the tray to a south-facing window or under a grow light. Beginner-friendly blooms need 12-14 hours of light daily to prevent leggy growth. If using a grow light, position it 2-3 inches above the tallest seedlings and raise it as they grow. You’ll know your light is sufficient when leaves are dark green and stems are thick, not stretched.
Water when the top inch of soil feels dry to the touch, using the bottom-watering method to avoid disturbing delicate roots. Fertilize for the first time 2 weeks after germination with the ½ teaspoon of starter fertilizer included in your kit, dissolved in 1 cup of water. This gives seedlings a gentle nutrient boost without overwhelming them.
⏰ Step 5: Thin and Harden Off for Transplanting
When seedlings reach 2 inches tall and have 3-4 true leaves, it’s time to thin. Use scissors to snip the weakest seedling at the soil line, leaving the strongest one in each pot. This reduces competition for nutrients and encourages bushier growth. If your kit includes larger pots, transplant the seedlings now—gently loosen roots and place them in the new container with fresh soil from the kit.
Two weeks before your last frost date, start hardening off by placing the tray outside in a sheltered, shaded spot for 1-2 hours the first day. Gradually increase outdoor time by 1 hour daily, moving to partial sun by day 5. By day 10, they should tolerate full sun. Watch for wilting or yellowing leaves—this means they’re not ready yet. Once hardened off, transplant to your garden or containers with the remaining 1 cup of potting mix from your kit.
Tips & tricks for perfect seedling growth
Transforming those tiny seeds into vibrant blooms requires precision—and I’ve learned a few tricks that make all the difference between thriving seedlings and disappointing failures. Here’s what nobody tells you about growing your kit successfully.
Soil Texture Matters: In Step 1, when you’re pressing down the 2 cups of seed-starting mix, think of it like fluffing a pillow—not squishing it. The goal is to create a firm yet aerated medium where roots can breathe. I press just until the soil holds its shape when tapped, but still feels light as a feather. Over-compacting in Step 1 will create a brick-like environment that strangles roots later.
Germination Temperature Secrets: That 65-75°F range in Step 3 isn’t just arbitrary—it’s the Goldilocks zone for most seed varieties. If your home runs cooler (below 65°F), don’t just hope for the best. Place your seedling heat mat directly under the tray and set it to 75°F—this creates a consistent warm layer that mimics spring soil temperatures. I’ve seen germination times cut in half with this simple adjustment.
Lighting Strategy for Strong Stems: When you move to bright light in Step 4, position your grow light 2-3 inches above the seedlings—but here’s the game-changer: adjust the height daily. As your seedlings grow, raise the light incrementally to maintain that distance. This prevents the "leggy syndrome" where stems stretch desperately toward light. I use a simple clothespin to mark the light’s position and move it up every 2-3 days.
Fertilizer Timing is Critical: That ½ teaspoon of starter fertilizer in 1 cup of water at the 2-week mark is your seedlings’ first real meal. But here’s what I learned the hard way: dilute it further if your seedlings look glassy or have dark spots. I now mix it at ¼ teaspoon per cup—half the recommended dose—to prevent root burn in these delicate early stages. Less is more with young plants!
Pro Tips for Growing Seeds Kit
- Transforming those tiny seeds into vibrant blooms requires precision—and I’ve learned a few tricks that make all the difference between thriving seedlings and disappointing failures.
- Soil Texture Matters: In Step 1, when you’re pressing down the 2 cups of seed-starting mix, think of it like fluffing a pillow—not squishing it.
- Germination Temperature Secrets: That 65-75°F range in Step 3 isn’t just arbitrary—it’s the Goldilocks zone for most seed varieties.
Frequently asked questions
Got questions about growing your own blooms with a seeds kit? You’re not alone!
Here are answers to the most common queries—from timing to troubleshooting—so you can grow with confidence.
How long does it take for seeds to sprout in a growing kit?
Most beginner-friendly kits sprout in 5–14 days, depending on the plant type. Check the kit’s instructions for specifics—some seeds (like sunflowers) may sprout faster than others (like herbs). Keep the soil moist but not soggy, and place the tray in bright, indirect light for best results.
Can I use a growing seeds kit indoors if I don’t have a sunny window?
Pair your kit with a grow light (LED or fluorescent) for 12–16 hours daily. Skip the sun? No problem—just ensure the light stays within 6–12 inches of the seedlings. Many kits include lights, but you can also buy affordable clip-on options for small spaces.
What’s the best way to water seeds without drowning them?
Use a spray bottle or a watering can with a gentle stream to avoid disturbing the soil. Water just enough to keep the top inch moist—overwatering is the #1 killer of young seeds. Pro tip: Place the tray on a saucer to catch excess water, but empty it after 10 minutes to prevent root rot.
What if my seeds don’t sprout after 2 weeks?
Don’t panic! First, check if the seeds were fresh (old seeds may fail). Try gently pressing a toothpick into the soil—if it resists, the seed might still be alive. If not, replant using new seeds or contact the kit’s customer support for replacements (many offer free swaps!).
Can I transplant seedlings from a kit into my garden later?
Yes! Once seedlings have 2–3 true leaves (not just the initial seed leaves), they’re ready for transplanting. Harden them off first by placing them outside for 1–2 hours daily over 5–7 days. Choose a cloudy day or shade spot to avoid shock. Most kits include transplanting tips—just follow the schedule!
Are there alternatives to traditional seed-starting kits?
Try biodegradable peat pots, egg cartons (poke drainage holes!), or DIY soil blocks for eco-friendly starts. For beginners, kits with built-in lights or hydroponic systems (like AeroGarden) are great low-maintenance alternatives. Pick based on your space and plant goals!
Wrapping up and next steps
Starting your gardening journey with a growing seeds kit is simpler—and more rewarding—than you might think! 🌱 With just a few weeks of care, you’ll witness tiny seeds transform into vibrant blooms, proving that anyone can cultivate beauty at home.
Whether you’re a busy parent, an urban dweller, or just curious about green thumbs, this beginner-friendly kit removes the guesswork and lets you enjoy the magic of growth.
Ready to take the next step? Pick your favorite seeds, gather your kit, and start planting today! Your future garden (and future self) will thank you for it. 🌸