
Propagation
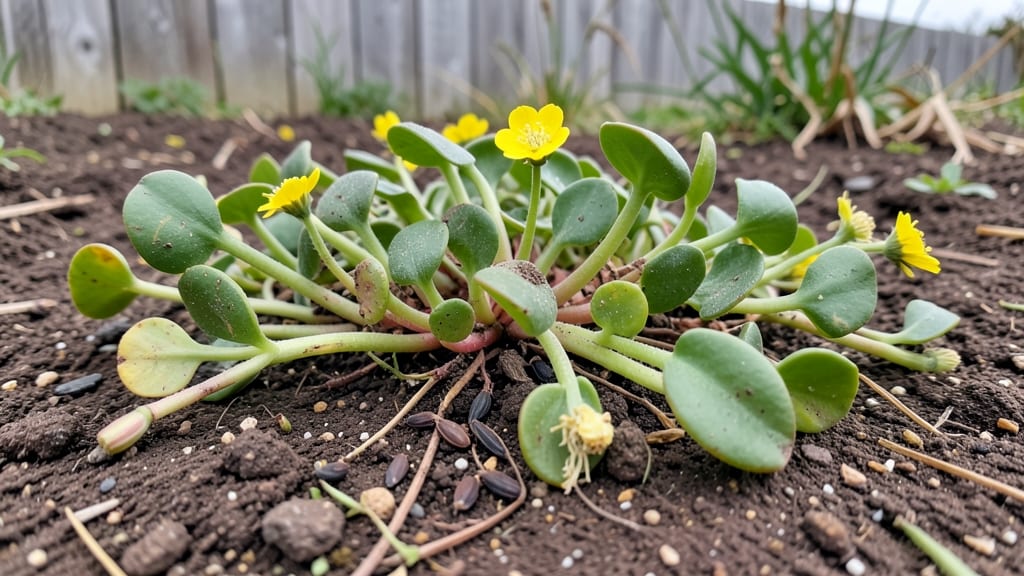
Purslane seeds edible? Absolutely—and growing it is easier than you think. 🌱 I learned the hard way that this little succulent packs more than just pretty leaves; it’s a nutritional powerhouse with omega-3s and vitamins that outshine most greens.
The catch? It grows wild but thrives even better when you nurture it intentionally.
You’ll need well-draining soil (sandy loam works best) and a sunny spot—purslane loves heat and neglect. Scatter those tiny seeds in early spring or late summer, barely covering them since light helps germination.
Water lightly, but don’t drown them; they’re drought-tolerant once established. Within weeks, you’ll have a carpet of bright green, slightly tangy leaves ready to harvest.
The payoff? Fresh greens that taste like a cross between spinach and lemon, packed with nutrients most store-bought greens lack. Harvest leaves anytime, but young plants produce the most tender shoots.
Just avoid the wild lookalike Portulaca oleracea (same plant, but sometimes mislabeled)—this is the real deal, and it’s shockingly resilient.
Perfect for containers, garden edges, or even as a ground cover. Once you grow it, you’ll wonder why you didn’t start sooner—it’s the kind of plant that rewards patience with flavor and health benefits. Let’s get those seeds in the ground!
📚 In This Guide
- What you need
- Instructions
- Tips and common mistakes
- Wrapping up and next steps
What you need
- ● Purslane seeds – 1–2 packets (500–1,000 seeds) (ensure they’re labeled as edible and organic if preferred).
- ● Seed-starting mix – 1–2 gallons (lightweight, well-draining potting soil with perlite or vermiculite).
- ● Containers – 4–6 small pots (3–4 inches deep) or seed trays with drainage holes.
- ● Spray bottle – For gentle watering (avoid over-saturating seeds).
- ● Plastic wrap or humidity dome – To retain moisture while seeds germinate.
- ● Grow lights or sunny windowsill – 6–8 hours of light daily (south-facing window or LED grow lights work best).
- ○ Fertilizer (optional but helpful) – Balanced liquid fertilizer (5-5-5 or 10-10-10) or compost tea for young seedlings.
- ● Garden bed or large containers – 12–18 inches deep (purslane thrives in warm, well-drained soil).
- ● Compost or aged manure – 1–2 cups per planting area to enrich soil.
- ○ Mulch (optional) – Straw or shredded leaves to retain moisture and suppress weeds.
- ● Hand trowel or small shovel – For transplanting seedlings gently.
- ● 💡 Test soil pH: Purslane prefers slightly acidic to neutral soil (6.0–7.0). A simple pH test kit makes this easy!
- ● 🌡️ Warmth matters: Seeds germinate best in 70–80°F (21–27°C) soil. Use a heat mat if your climate is cool.
- ● 🎯 Thin seedlings: Once sprouts have 2–3 true leaves, thin to 2–3 inches apart for optimal growth.
Step-by-Step instructions for growing edible purslane from seed
This fast-growing, omega-3-rich green thrives with minimal fuss—here’s how to coax it from seed to plate.
🌱 Step 1: Prepare the Perfect Germination Mix
Purslane seeds need loose, well-draining soil to sprout quickly. Fill your 4-inch pots with a mix of 50% potting soil and 50% coarse sand or perlite. This prevents the tiny seeds from suffocating under dense soil. Moisten the mix until it’s damp but not soggy—think of a wrung-out sponge.
Smooth the surface with your fingers to create a flat planting bed. Purslane seeds are tiny (about the size of poppy seeds), so I use a toothpick to make shallow furrows ¼ inch deep. Scatter the seeds sparsely—crowding leads to weak, leggy plants. A light misting with water keeps them in place without burying them too deep.
💧 Step 2: Create a Humid, Warm Germination Environment
Cover the pots with clear plastic wrap or a humidity dome to trap warmth and moisture. Purslane germinates best at 70-75°F, so place them on a seedling heat mat if your home runs cooler. Check daily for condensation—if the plastic fogs up, the environment is perfect.
Keep the soil consistently moist but never waterlogged. Overwatering at this stage drowns seeds before they sprout. You’ll see tiny green shoots in 5-10 days, but don’t be surprised if germination takes up to 2 weeks—purslane is patient but persistent.
☀️ Step 3: Provide Bright, Indirect Light for Seedlings
Once sprouts emerge, remove the plastic immediately to prevent fungal growth. Place the pots in a spot with bright, indirect light—a south-facing window works, but avoid harsh midday sun, which scorches tender leaves. If your light is weak, supplement with a grow light 4-6 inches above the plants for 12-14 hours daily.
Purslane seedlings grow fast, so rotate the pots a quarter turn daily to prevent them from stretching toward one light source. You’ll know they’re thriving when the first true leaves (not the initial seed leaves) appear in 2-3 weeks. These leaves should be plump and bright green, not thin or yellowed.
🌿 Step 4: Thin and Transplant for Bushier Growth
When seedlings are 1-2 inches tall, thin them to 1 plant per pot or 4 inches apart in the garden. Use sharp scissors to snip excess seedlings at soil level—this prevents disturbing roots and gives you edible microgreens to snack on immediately.
If transplanting outdoors, wait until nighttime temperatures stay above 50°F. Purslane is heat-tolerant but won’t survive frost. Harden off seedlings by placing them outside in shade for 1 hour daily over 5-7 days, gradually increasing exposure. You’ll know they’re ready when they bounce back from a full day in the sun.
✂️ Step 5: Harvest and Encourage Continuous Growth
Harvest leaves when plants are 3-4 inches tall by snipping the outer leaves with clean scissors. This encourages bushier growth and prevents bolting. Purslane’s tangy flavor peaks when leaves are young and tender—older leaves become more bitter.
Water at the base every 2-3 days during dry spells, keeping the soil evenly moist but never waterlogged. With regular harvesting, your plants will produce continuous greens for 6-8 weeks. Save seeds from mature plants for next season—they’re packed with nutrients and easy to collect!
Tips & tricks for perfect purslane seedlings
Growing purslane from seed is easier than you think—once you know these game-changing tips! These little tricks will help you avoid common pitfalls and get the most vibrant, nutrient-packed greens possible.
Soil Texture is Everything: The 50/50 mix of potting soil and coarse sand or perlite in Step 1 isn't just about drainage—it's about creating the perfect air pockets for those tiny purslane seeds. I learned this the hard way after planting in regular potting soil, where seeds either didn't sprout or grew leggy. Think of it like giving your seeds a fluffy cloud to nest in rather than compacted dirt. If you don't have perlite, crushed gravel or even clean coarse builder's sand works in a pinch.
Germination Heat Hack: Those 70-75°F temperatures in Step 2 are crucial—purslane seeds are tropical babies that won't sprout well if your home runs cool. I keep my seedling heat mat plugged in under my kitchen counter (it's right next to the window) and cover the pots with clear plastic wrap. The condensation that forms on the plastic is your secret signal that conditions are perfect. Pro tip: If your home stays below 70°F, consider using a seedling heating pad or even placing pots on top of your fridge (just test the surface temperature first!).
Light Rotation Strategy: That daily quarter-turn rotation in Step 3 might seem minor, but it's what prevents your seedlings from growing into lopsided, weak plants reaching desperately for the light. I set a timer on my phone for the same time every day—it's like giving your plants a little dance party to keep them balanced. For extra growth boost, place your grow light on a timer for those 12-14 hours daily. This consistency mimics natural daylight cycles and prevents the "light stretch" that makes plants tall and spindly.
Harden Off Gradually: The 5-7 day hardening process in Step 4 is where most people rush and end up with shocked plants. Start with just 1 hour in shade, then gradually increase exposure. I like to move my pots to a sheltered spot on my balcony where they get morning sun but afternoon shade. Watch your plants closely—they'll tell you when they're ready with their posture. Healthy plants will bounce back from a full day in the sun, while stressed ones will wilt dramatically. This gradual approach builds their resilience for the heat and wind outdoors.
Pro Tips for Purslane Seeds Edible
- Growing purslane from seed is easier than you think—once you know these game-changing tips!
- Soil Texture is Everything: The 50/50 mix of potting soil and coarse sand or perlite in Step 1 isn't just about drainage—it's about creating the perfect air pockets for those tiny purslane seeds.
- Germination Heat Hack: Those 70-75°F temperatures in Step 2 are crucial—purslane seeds are tropical babies that won't sprout well if your home runs cool.
Frequently asked questions
Got questions about growing and using purslane seeds?
Here are some of the most common ones—plus quick, practical answers to help you succeed!
Can you eat purslane seeds directly, or do they need to be cooked first?
Purslane seeds are technically edible raw, but they’re much easier to digest when lightly toasted or cooked. Roasting them (like sunflower seeds) brings out their nutty flavor and makes them crunchier. If you’re growing purslane for greens, focus on the leaves—they’re far more versatile and nutrient-dense!
How long does it take for purslane seeds to sprout and grow edible greens?
Purslane seeds germinate fast—often within 3–7 days in warm soil (70°F+). You’ll see tender greens ready to harvest in just 4–6 weeks! For a continuous supply, sow seeds every 2–3 weeks. Pro tip: Thin seedlings to 6–8 inches apart to avoid overcrowding.
What’s the best way to store purslane seeds for next year’s planting?
Store seeds in a cool, dry place (like a sealed jar in the fridge) for up to 2 years. For extra freshness, dry them completely on a paper towel before storing. If you’re short on seeds, let a few plants bolt—they’ll produce more seeds naturally!
Are there any alternatives to purslane if I can’t grow it myself?
Try portulaca (moss rose), amaranth greens, or quinoa for similar textures and omega-3s. For a quick fix, check local farmers’ markets—purslane is often sold as a specialty green. Bonus: These plants thrive in hot climates too!
What should I do if my purslane plants look wilted or diseased?
Purslane is drought-tolerant, but wilting can signal overwatering or fungus (like powdery mildew). Improve airflow, water at the base, and avoid wetting leaves. For pests, spray with neem oil or introduce ladybugs. If all else fails, harvest the healthy leaves and compost the rest!
Wrapping up and next steps
Discovering that purslane seeds are edible opens up a world of nutritious, homegrown greens packed with omega-3s, vitamins, and antioxidants! 🌱 Whether you're a seasoned gardener or just starting, growing purslane is a rewarding way to boost your diet with minimal effort.
Now that you know the how-tos, why not take the next step and plant your own batch?
Start small—try a few seeds in pots or your garden—and watch this resilient plant thrive. Share your harvest with friends or experiment with recipes like salads, stir-fries, or pestos. Your kitchen (and health) will thank you! 😊