Watering
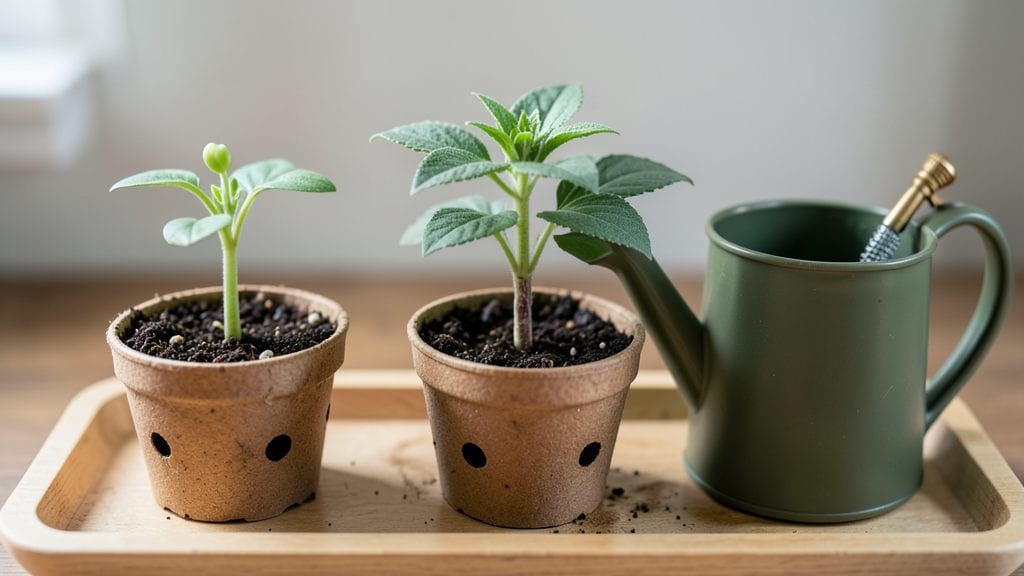
The perfect zinnia starts with knowing exactly what each seedling stage looks like. ✨ I’ve tracked every sprout from the first green tooth to full bloom, and these visual cues will help you spot problems before they derail your plants.
The difference between thriving seedlings and sad, leggy flops often comes down to recognizing these stages early.
From germination to true leaves, zinnia seedlings follow a predictable pattern: first the tiny cotyledons (those first two leaves), then the first set of real leaves about a week later.
Each stage needs slightly different care—more light after the first leaves appear, gentler watering once roots start showing through the bottom of the pot. Skipping this attention means weak stems and slow growth.
By the time they’re ready to transplant, your seedlings should be sturdy, with at least four sets of true leaves and a strong root system. That’s when the real magic happens—they’ll explode into color within weeks.
The key is catching issues like damping-off (fuzzy mold) or overcrowding early, before they stunt your plants.
This works for both indoor starts and direct-sown seedlings, whether you’re in a sunny window or under grow lights. Let’s walk through each stage so you can grow zinnias that make your neighbors jealous.
📚 In This Guide
- What you need
- Instructions
- Tips and common mistakes
- Wrapping up and next steps
What you need
- ● Zinnia seeds: Choose heirloom or hybrid varieties (e.g., Zinnia elegans)—about 10–20 seeds for a small garden patch.
- ● Seed-starting mix: A lightweight, sterile potting mix (avoid garden soil—it’s too dense!). A 10–12 quart bag works for most setups.
- ● Containers: Seed trays or biodegradable pots (3–4" deep) for seedlings.
- ● OR a flat seed tray with drainage holes (10–20 cells).
- ● Watering can or spray bottle: A fine-mist sprayer keeps seeds from washing away.
- ● Grow lights or sunny windowsill: 12–16 hours of light daily (LED grow lights work great if natural light is limited).
- ○ Heat mat (optional but helpful): A seedling heat mat (70–80°F range) speeds up germination.
- ● Plant labels: Small stakes or toothpicks to mark seedlings (write seed variety + date!).
- ● Fertilizer: A balanced, water-soluble fertilizer (e.g., 10-10-10) for transplanting.
- ● Scissors or knife: For pricking out seedlings (carefully separating them for transplanting).
- ● Transplanting pots or garden bed: 5–6" deep containers or well-drained soil (zinnias hate soggy roots!).
- ○ Mulch (optional): Straw or shredded leaves to retain moisture and suppress weeds.
Zinnia seedling stages: how to grow perfect blooms from start to finish
Here's how to track each growth phase—so you'll know exactly when to act.
🌱 Step 1: Germination (Days 5-14)
The first true test of your zinnias' success happens here. After planting seeds ¼ inch deep in warm soil, germination typically occurs within 5-14 days—though cooler rooms may take longer. You'll see tiny green hooks break through the soil first, those are your seedlings' first leaves (called cotyledons).
Keep the soil consistently moist but never soggy—watering from below with a tray prevents disturbing delicate sprouts. If you notice black, mushy stems, that's damping-off, a fungus that thrives in overly wet conditions. Remove affected seedlings immediately and reduce watering slightly. A humidity dome helps maintain even moisture without overwatering.
🌿 Step 2: Cotyledon to First True Leaves (Days 14-21)
Once the initial pair of leaves (cotyledons) unfurl, you're entering the critical early growth phase. These leaves look different from later foliage—they're usually rounder and thicker. Within 7-10 days after germination, you'll see the first set of true leaves emerge, which resemble miniature versions of the mature plant's foliage.
This is when I start my seedlings under a grow light if natural light is insufficient. Without enough light, seedlings stretch toward any available source, creating weak stems that can't support heavy blooms later. You'll know your light is working if the seedlings grow upright with dark green leaves spaced about 1 inch apart.
⏰ Step 3: Vegetative Growth (Weeks 3-6)
Between 3-6 weeks, your zinnias enter their most rapid growth phase. You'll notice stems thickening and leaves developing serrated edges. This is when I pinch back the main stem just above the third set of true leaves to encourage bushier growth. Pinching removes the top growth, which signals the plant to produce side shoots.
Watch for aphids or spider mites during this stage—they love tender new growth. Gently spray plants with water to dislodge pests, or apply neem oil if infestations persist. You'll see healthy growth when new leaves emerge with a vibrant green color and no visible damage. This vigorous phase sets the foundation for strong blooming stems later.
☀️ Step 4: Bud Formation (Weeks 6-8)
Around 6-8 weeks, you'll notice small green buds forming at the stem tips. These buds will eventually open into your colorful blooms. This is when zinnias need full sun exposure—at least 6-8 hours daily. Move plants outdoors gradually if they've been started indoors to avoid transplant shock.
You'll see buds develop in a spiral pattern up the stem. Each bud should feel firm to the touch—soft or mushy buds may indicate overwatering or fungal issues. Reduce watering slightly during this stage to allow roots to strengthen. The transition from vegetative growth to flowering marks the most exciting phase—your hard work is paying off with visible blooms on the horizon.
✂️ Step 5: Blooming and Maintenance (Weeks 8-12+)
When zinnias finally bloom, you'll recognize them by their distinctive daisy-like flowers. Each bloom lasts about 7-10 days before wilting. To encourage continuous flowering, deadhead spent blooms by snipping the stem just above the next set of leaves. This redirects the plant's energy toward producing new flowers rather than setting seed.
You'll see your zinnias produce more blooms if you fertilize lightly every 2-3 weeks with a balanced fertilizer. Watch for powdery mildew on leaves during humid weather—improve air circulation and avoid overhead watering to prevent this common issue. With proper care, your zinnias will keep blooming until the first frost, providing vibrant color all season long.
Tips & tricks for perfect zinnia seedling growth
A few key insights that'll help you navigate each growth stage like a pro and avoid common pitfalls along the way.
Germination Success: During those critical 5-14 days of germination, maintain consistent soil moisture by using a spray bottle rather than pouring water directly. The soil should feel like a damp sponge—not soggy. I've found that placing the seed tray on a heating mat set to 70-75°F speeds up germination by 2-3 days in cooler climates. Trust me on this—warmth makes all the difference when waiting for those first green hooks to appear.
Lighting Strategy: In Step 2, when you're waiting for those true leaves to emerge within 7-10 days, position your grow light 2-3 inches above seedlings and keep it on for 14-16 hours daily. I learned this the hard way after getting leggy seedlings from lights that were too far away. Rotate the tray daily so all seedlings get equal light exposure—this prevents them from growing toward one side.
Pinching Technique: When you reach the 3-6 week vegetative growth phase, use clean scissors to pinch just above the third set of true leaves. I always make the cut at a 45-degree angle to prevent water from pooling on the stem. This small detail helps avoid fungal issues later. The goal is to remove about 1/3 of the plant's height—don't go overboard, or you'll stunt growth rather than encourage bushiness.
Bud Care: During the 6-8 week bud formation stage, I've found that gently brushing buds with your fingers helps prevent powdery mildew. The physical contact disturbs potential fungal spores. Also, if you notice buds forming but not opening, it might be too cool—zinnias need daytime temperatures above 65°F to bloom properly. A clear plastic tent over the plants on chilly mornings can make all the difference.
Pro Tips for Zinnia Seedling Stages
- A few key insights that'll help you navigate each growth stage like a pro and avoid common pitfalls along the way.
- Germination Success: During those critical 5-14 days of germination, maintain consistent soil moisture by using a spray bottle rather than pouring water directly.
- Lighting Strategy: In Step 2, when you're waiting for those true leaves to emerge within 7-10 days, position your grow light 2-3 inches above seedlings and keep it on for 14-16 hours daily.
Frequently asked questions
Got questions about zinnia seedling stages?
Here are answers to the most common ones—so you can nurture healthy seedlings from start to stunning bloom!
How long does it take for zinnia seedlings to germinate?
Zinnia seeds typically sprout within 5–14 days after planting, depending on temperature and moisture. Keep soil consistently moist (not soggy) and maintain warmth (around 70–75°F) for faster germination. Patience is key—some varieties may take longer!
What do healthy zinnia seedlings look like at each stage?
Here’s a quick visual guide:
- Germination (Days 5–14): Tiny green sprouts with cotyledons (first leaves).
- Seedling (Weeks 2–3): True leaves emerge (narrow, toothed edges).
- Vegetative (Weeks 4–6): Bushy growth with 6–8 leaves before flowering.
- Blooming (Weeks 7–10+): Buds form, then open into vibrant blooms!
Why are my zinnia seedlings wilting or turning yellow?
Wilted or yellowing seedlings often signal overwatering, underwatering, or poor drainage. Check soil moisture—it should feel damp but not waterlogged. Yellow lower leaves may also indicate nutrient deficiency (try a balanced fertilizer). Ensure pots have drainage holes to avoid root rot!
Can I plant zinnia seedlings too early in the season?
Zinnias are warm-season lovers—plant them after the last frost when soil temps reach 55°F+. Starting indoors 6–8 weeks before transplanting helps, but seedlings can’t handle cold snaps. Use row covers if nights are chilly to protect young plants.
What’s the best way to harden off zinnia seedlings before transplanting?
Harden off seedlings 7–10 days before moving them outdoors by gradually exposing them to sunlight and wind:
- Day 1–3: Place in partial shade for 1–2 hours.
- Day 4–6: Increase to 4–6 hours of direct sun.
- Day 7–10: Move to full sun for the full day.
Wrapping up and next steps
Understanding the zinnia seedling stages is your secret weapon for nurturing vibrant blooms from tiny seeds! From those first cotyledon leaves to full-blooming glory, each phase offers a chance to fine-tune care—watering, sunlight, and patience.
With the right knowledge, you’ll turn fragile seedlings into a showstopping garden centerpiece in no time.
Now that you’re armed with insights, it’s time to roll up your sleeves! 🌱 Start by planting your seeds (or seedlings) in well-draining soil and keep an eye on their progress.
Before you know it, your garden will be bursting with color—and you’ll be the proud gardener behind it all.