
Pruning
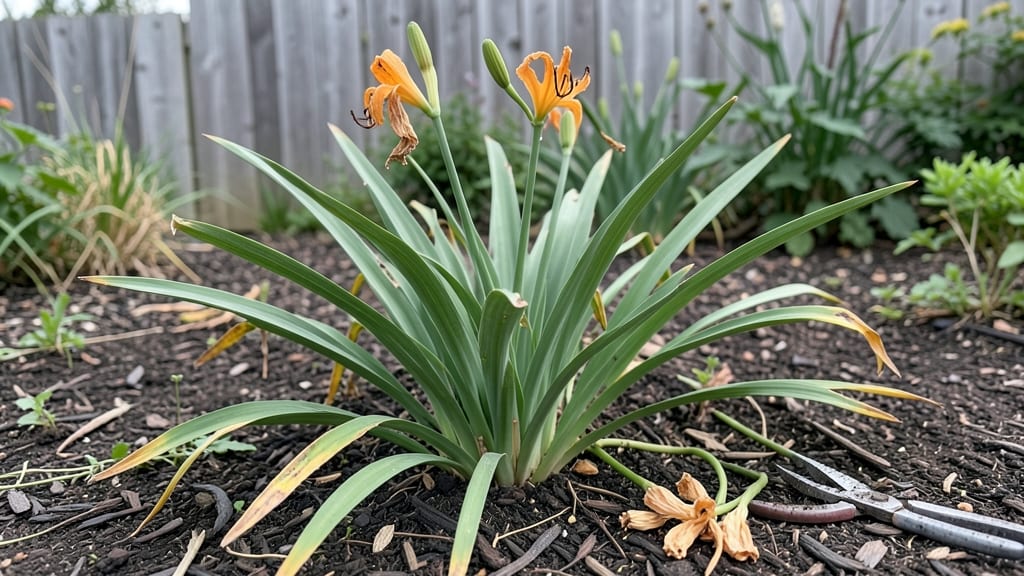
Deadheading daylilies and seed pods transforms a single-season show into a garden that blooms from early summer until frost. 🌸 I’ve spent years watching daylilies go from one glorious flush of flowers to a sad, spent look—until I learned the simple trick of snipping at the right time.
The difference? Plants that keep producing vibrant blooms instead of wasting energy on seed pods.
You’ll need just three things: sharp pruners, a pair of gloves (daylilies can be thorny), and about 10 minutes after each bloom cycle.
The key is timing—cut spent blooms when they’re brown but before seed pods form, or trim pods when they’re still small to redirect energy back to the roots. Overcrowding from seed pods is the real villain here, but this method keeps your plants lush and productive.
What you’ll end up with is a daylily patch that looks like it’s in peak season all summer long. The foliage stays thick and green, and you’ll see new buds forming on the same stalks within weeks.
No more waiting for a second bloom—just continuous color that makes your garden the envy of the neighborhood.
This works for both heirloom and hybrid varieties, and it’s especially helpful if you’re growing daylilies in containers or small spaces. The less energy they spend on seeds, the more they invest in those stunning blooms you planted them for in the first place.
📚 In This Guide
- What you need
- Instructions
- Tips and common mistakes
- Wrapping up and next steps
What you need
- ● Pruning shears or bypass pruners: Choose sharp, clean tools with bypass blades (not anvil-type) to avoid crushing stems. A 5- to 6-inch pair works best for daylilies.
- ● Gloves: Wear garden gloves (nitrile or leather) to protect your hands from thorns or rough foliage.
- ● Garden scissors or snips: For smaller stems or seed pods, a small, sharp pair (like Felco or Fiskars) is ideal.
- ● Trash bag or bucket: A 10-20 gallon bag or bucket for collecting debris—daylilies produce a lot of spent blooms!
- ○ Compost bin or pile: Optional but helpful for recycling plant waste.
- ● Disinfectant (rubbing alcohol or bleach solution): Wipe tools between cuts to prevent disease spread (1 part bleach to 9 parts water).
- ● Knee pads or stool: For comfort if you’re working with large patches of daylilies.
- ● Label markers: If you’re dividing plants, use waterproof markers to label new sections.
- ● Hose with nozzle: For rinsing off tools or refreshing tired plants post-pruning.
Instructions for deadheading daylilies and seed pods
Here's how I keep my daylilies blooming all season long—no fancy tools, just smart timing.
✂️ Step 1: Identify When to Deadhead
Wait until the blooms are fully open but starting to fade—usually 3-5 days after flowering. You'll see petals drooping slightly or turning brown at the edges. This is the moment that matters: cut the spent bloom just above the first healthy leaf node where new buds form.
I always check the stem first—if it's still firm and green, the plant is ready for pruning. If the stem feels soft or mushy, wait a day or two. Cutting too early removes potential new buds, while waiting too long lets the plant waste energy on seed production.
✂️ Step 2: Use the Right Cutting Technique
Grab your clean, sharp pruners and make a 45-degree angle cut about ½ inch above the leaf node. This angled cut helps water run off the stem instead of pooling and rotting. I like to sterilize my pruners with rubbing alcohol between plants to prevent spreading diseases.
Don't pull or tear the blooms—this can damage the stem and leave ugly stubs. A clean cut keeps the plant looking tidy and encourages stronger regrowth. If you're working with multiple plants, I find it helps to cut one bloom completely first so you can see the right angle before tackling the rest.
🌱 Step 3: Remove Seed Pods for Continuous Blooms
Seed pods form after blooms fade, and they signal the plant to stop producing flowers. To keep your daylilies blooming, remove these pods as soon as they appear. They look like small, green bulges where the bloom was attached—grab them gently and twist or snip them off.
Here's the thing—if you let seed pods stay on the plant, you'll get fewer blooms overall. I usually check my plants every 5-7 days during peak bloom season to stay ahead of pod formation. This extra step means more flowers and fewer surprises when your daylilies suddenly stop blooming mid-season.
🌿 Step 4: Clean Up and Encourage New Growth
After deadheading, take a moment to tidy up any yellow or damaged leaves. Use the same pruners to snip off leaves that are more than 50% brown or diseased. This keeps your plants healthy and prevents pests from moving in. I like to do this cleanup in the early morning when the plants are full of moisture.
Water your daylilies deeply after pruning to help them recover. You'll see new buds forming within 2-3 weeks if everything went well. The key is consistency—regular deadheading and pod removal keep your daylilies looking fresh and blooming like crazy all season.
⏰ Step 5: Time Your Deadheading for Seasonal Changes
In late summer or early fall, slow down on deadheading. Let some blooms go to seed so you can collect seeds for next year's garden. I usually stop deadheading completely after mid-September to give my plants a chance to store energy for next season.
If you're in a colder climate, you can also do a light deadheading in early spring to remove any winter-damaged blooms before new growth starts. This gives your daylilies a clean start and helps them focus energy on producing fresh, vibrant flowers. Real talk: a little seasonal adjustment makes a huge difference in how your plants perform year after year.
Tips & tricks for perfect daylily maintenance
A few simple tricks that'll keep your daylilies blooming beautifully all season long.
Timing Secret: In Step 1, those 3-5 days after flowering are crucial. I've found that checking blooms in the morning light helps spot the subtle color changes that signal it's time to deadhead. The petals should look like they're about to close up—this is your cue. Waiting until they're completely brown means you've missed the window for encouraging new buds.
Cutting Technique Tip: The 45-degree angle cut in Step 2 isn't just about looks—it's about plant health. That angled cut prevents water from pooling at the stem base, which could lead to rot. I keep a small bottle of rubbing alcohol handy to sterilize my pruners between plants. It takes 10 seconds but prevents diseases from spreading between your daylilies. Don't skip this, especially if you have multiple plants!
Seed Pod Strategy: When you're checking your plants every 5-7 days in Step 3, look for those tiny green bulges—they're seed pods forming. The moment you spot them, remove them completely. I've seen daylilies that had 20 blooms suddenly drop to 5 just because the seed pods weren't removed. Pro tip: Use your fingernails to gently twist them off—no need for pruners unless they're stubborn.
Seasonal Adjustment: That mid-September cutoff in Step 5 is important, but don't treat it as a hard rule. In my zone 6 garden, I actually start tapering off deadheading around late August. The key is watching your plants—they'll start showing signs of slowing down naturally. If you're in a warmer climate, you might extend this until October. The goal is to let the plant store energy for next season.
Pro Tips for Deadheading Daylilies And Seed Pods
- A few simple tricks that'll keep your daylilies blooming beautifully all season long.
- Timing Secret: In Step 1, those 3-5 days after flowering are crucial.
- Cutting Technique Tip: The 45-degree angle cut in Step 2 isn't just about looks—it's about plant health.
Frequently asked questions
Got questions about keeping your daylilies blooming and your garden tidy? Here are some of the most common ones—plus quick, expert-approved answers to help you garden like a pro!
When is the best time to deadhead daylilies?
Deadhead daylilies as soon as blooms fade—usually within 1-2 days—to encourage more flowers. For spring-blooming varieties, start in early summer; for rebloomers, repeat every 2-3 weeks until frost. Pro tip: Morning deadheading prevents pests from feasting on spent blooms!
Should I remove seed pods from daylilies?
Yes! Seed pods (those puffy, dried-up pods) drain energy from the plant. Snip them off before they turn brown to redirect nutrients to foliage and future blooms. Bonus: Removing pods also prevents unwanted "volunteer" daylilies popping up elsewhere in your yard.
How often do I need to deadhead for continuous blooms?
Reblooming daylilies need weekly checks during peak bloom (spring/summer). For once-blooming types, one round of deadheading after the initial flush is enough. Watch for: If flowers slow down, you’re either over- or under-deadheading—find that sweet spot!
Can I deadhead daylilies without cutting tools?
Use your fingers or gloves to pinch off faded blooms at the base. For seed pods, gently twist and pull (they’ll snap cleanly). Warning: Avoid tugging hard—daylilies are tough but not indestructible! A small pair of pruners works too for stubborn stems.
What if my daylilies stop blooming after deadheading?
Check these fixes:
- Over-pruning: Never cut more than 1/3 of the foliage.
- Underwatering: Daylilies need 1 inch of water weekly.
- Old plants: Divide clumps every 3-4 years to rejuvenate blooms.
- Low light: Move to sunnier spots (6+ hours/day).
If the issue persists, your variety might be a once-bloomer—no fix needed!
Wrapping up and next steps
Deadheading daylilies and removing seed pods isn’t just about keeping your garden tidy—it’s a game-changer for healthier plants, vibrant blooms, and less work in the long run. 🌿 With the right tools and a little patience, you’ll transform your garden into a year-round showstopper.
Ready to take the next step?
Start by scheduling regular checks—even just 10 minutes a week makes a difference! Grab your pruners and head outside; your garden (and future self) will thank you. Happy pruning! 🌸