
Propagation
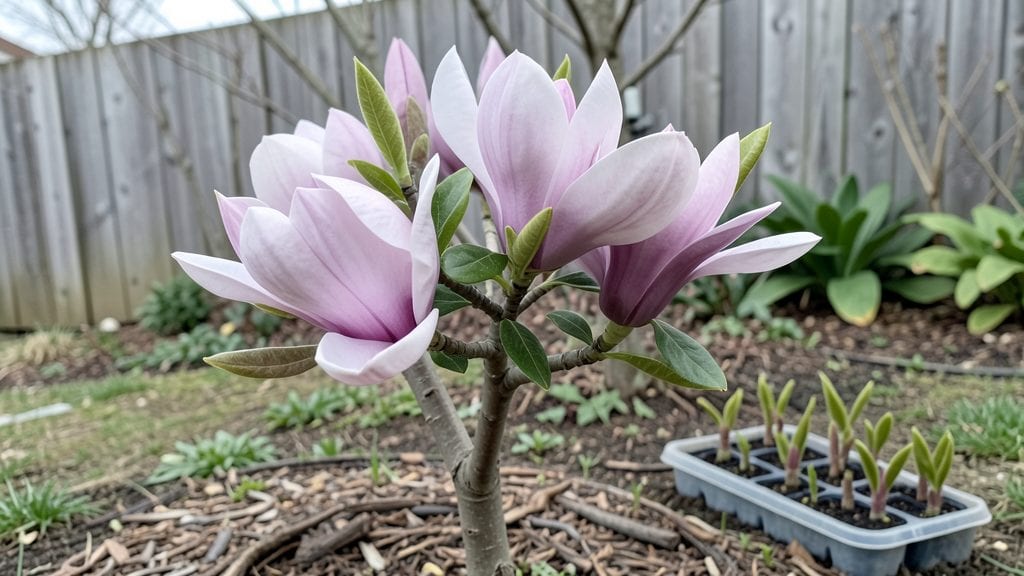
Growing Magnolia soulangeana from seeds unlocks a tree that’ll dominate your landscape with shockingly lush pink-purple blooms—but the layered chill method is where most gardeners stumble. I’ve struggled with this process too, watching seeds either rot or refuse to sprout despite perfect conditions.
The key isn’t just cold treatment; it’s mimicking the natural rhythm of dormancy and warmth that these seeds crave.
You’ll need three things: fresh seeds (collected in fall or bought from a reputable supplier), a foolproof mix of peat moss and perlite, and patience—this isn’t a quick process.
Start by scarifying the seeds lightly with sandpaper to break dormancy, then layer them in a sealed container with slightly damp mix. Place it in the fridge for 8-12 weeks, checking monthly to prevent mold. This stratification mimics winter’s slow thaw, priming seeds for spring.
Once you transfer them to a sunny windowsill or heat mat at 65-75°F, germination can take 3-6 months—sometimes longer. The first true leaves will be tiny and delicate, but don’t rush transplanting. Wait until they’re 3-4 inches tall before moving them to individual pots with well-draining soil.
By next spring, you’ll have seedlings strong enough to plant outdoors, where they’ll eventually grow into 20-foot giants with fragrant blooms.
Fair warning: Magnolia soulangeana seeds are notoriously slow to bloom from seed—10-15 years is typical. But the payoff? A tree that outshines nursery-grown specimens, adapted to your exact climate.
For faster results, consider grafting onto a rootstock, but the layered chill method builds resilience from the start. Here’s how to get those first sprouts without the guesswork.
📚 In This Guide
- What you need
- Instructions
- Tips and common mistakes
- Wrapping up and next steps
What you need
- ● Fresh or stored Magnolia soulangeana seeds – Collect them from ripe seed pods (or purchase from a trusted supplier). Aim for 3–5 seeds to maximize success.
- ● Well-draining potting mix – A blend of 50% peat moss or coconut coir and 50% perlite or coarse sand (sterilized). Avoid heavy garden soil.
- ● Small pots or seed trays – Use 3–4 inch diameter pots with drainage holes or a shallow tray lined with a breathable growing mat.
- ● Plastic wrap or humidity dome – To maintain moisture and warmth during germination.
- ● Spray bottle with water – For gentle hydration without disturbing seeds.
- ● Pruning shears or knife – For carefully extracting seeds from pods (if harvesting fresh).
- ● Refrigerator with a crisper drawer – For the 3–4 month cold stratification phase (set to 35–45°F).
- ● Grow lights or sunny windowsill – A south-facing window or LED grow lights (12–14 hrs/day) for post-chill growth.
- ○ Thermometer (optional) – To monitor soil temps during germination (65–75°F ideal).
- ● Label markers & tags – To track planting dates and seed varieties.
- ● Patience – Magnolia seeds can take 6–12 months to germinate!
- ● Space for long-term growth – Seedlings need 3–5 years before flowering.
- ● Basic plant care knowledge – Familiarity with watering, humidity, and light needs.
Step-by-Step instructions for germinating magnolia soulangeana seeds
This layered chill method mimics nature's winter cycle to coax stubborn magnolia seeds into life.
Stratify Seeds in Moist Sand
Fill a sealed plastic bag with the 4 cups of coarse sand and add 20 magnolia seeds. Moisten the sand until it feels like a wrung-out sponge—damp but not dripping. Seal the bag and place it in the refrigerator for 90 days. This cold, moist treatment breaks seed dormancy by simulating winter conditions.
Check the bag weekly. If the sand feels dry, sprinkle a few drops of water and reseal. After 90 days, remove the bag and leave it at room temperature for another 30 days to complete the stratification process. You’ll know it’s working when the seeds start to soften slightly—this means the internal inhibitors are breaking down.
Plant Stratified Seeds in Pots
Fill 4-inch pots with the 2 gallons of well-draining potting mix, leaving ½ inch of space at the top. Plant 5 seeds per pot at a depth of ½ inch, spacing them evenly. Press the soil gently around each seed to ensure good contact but avoid compacting it too firmly.
Water the pots lightly until the soil is evenly moist, but not soggy. Place them in a shady spot with indirect light—direct sun at this stage can stress the delicate seedlings. Cover each pot with a clear plastic dome to retain humidity, which helps prevent desiccation during germination.
Maintain Consistent Moisture and Warmth
Keep the pots in a location with 65–75°F temperatures—a sunny windowsill or under a grow light works well. Water the pots every 3–4 days, checking the top inch of soil for dryness. Overwatering now can cause rot, so let the soil dry slightly between waterings.
Germination can take 30–90 days, depending on seed viability. When the first true leaves appear (not the initial seed leaves), remove the plastic domes immediately. This prevents fungal growth and encourages stronger stems. Thin to the strongest seedling per pot once they reach 2 inches tall, using clean scissors to avoid disturbing roots.
Harden Off and Transplant
After 3 months, when seedlings have 4–6 true leaves, begin hardening them off. Move the pots outside to a sheltered, shaded spot for 2 hours the first day, gradually increasing exposure over 10–14 days. This acclimates them to outdoor conditions before transplanting.
Choose a partially shaded location with well-draining soil for permanent planting. Dig holes twice as wide as the pots but only as deep as the root ball. Space seedlings 10 feet apart to allow for mature growth. Water deeply after transplanting to settle the soil and reduce shock.
Winter Protection for Young Trees
For the first two winters, protect young magnolias with burlap wraps or a thick layer of mulch (use the remaining 2 cups of mulch) around the base. This insulates roots from freezing temperatures. Prune any dead or weak branches in late winter to encourage a strong structure.
Magnolia seedlings grow slowly, so patience is key. By year 5, you’ll see the first blooms—worth every step. Keep the soil consistently moist but never waterlogged, and avoid heavy fertilizers, which can burn tender roots. With proper care, your Soulangeana will reward you with stunning spring flowers for decades.
Tips & tricks for perfect magnolia soulangeana germination
Mastering this layered chill method transforms stubborn magnolia seeds into thriving saplings—here’s how to optimize each critical phase.
Stratification Precision: The 90-day refrigerator period is non-negotiable for breaking dormancy, but consistency matters more than the clock. I place my bag in the crisper drawer where temperatures hover around 40°F—cooler than the main fridge—mimicking natural winter conditions more closely. After removing the bag at day 90, I immediately transfer it to a spot with stable 75°F warmth to trigger germination without shocking the seeds.
Moisture Management: During the 30-day room-temperature phase, I weigh my sealed bag daily. If condensation forms on the inside, I open it briefly to release excess moisture—this prevents anaerobic conditions that could rot seeds. The sand should feel like a damp sponge; if it sticks together when squeezed, it’s too wet. For the 4-inch pots in Step 2, I use a spray bottle to water gently rather than pouring directly, which helps maintain even moisture without displacing seeds.
Light and Humidity Balance: In Step 3, indirect light is crucial, but I’ve found that placing pots under a grow light set to 12-hour cycles accelerates germination without risking sunburn. The plastic domes should create a humid microclimate, but I remove them for 10 minutes daily to prevent fungal buildup. When true leaves appear, I increase ventilation gradually to harden seedlings—this mimics natural wind exposure and strengthens stems.
Transplanting Strategy: For Step 4’s hardening-off period, I start with just 2 hours outside on day 1, then add 30 minutes daily. By day 10, seedlings can handle 4 hours of partial shade. When transplanting, I mix the remaining 2 cups of mulch into the planting hole’s surrounding soil—this creates a moisture-retaining barrier while insulating roots. The 10-foot spacing might seem excessive, but magnolias develop extensive root systems that need room to establish.
Pro Tips for Magnolia Soulangeana Seeds
- Mastering this layered chill method transforms stubborn magnolia seeds into thriving saplings—here’s how to optimize each critical phase.
- Stratification Precision: The 90-day refrigerator period is non-negotiable for breaking dormancy, but consistency matters more than the clock.
- Moisture Management: During the 30-day room-temperature phase, I weigh my sealed bag daily.
Frequently asked questions
Got questions about growing Magnolia soulangeana from seeds?
You’re not alone! Here are the most common queries—and straightforward answers—to help you succeed with the layered chill method.
How long does it take for Magnolia soulangeana seeds to germinate?
Patience is key! Germination can take anywhere from 3 to 6 months, depending on seed maturity, stratification success, and environmental conditions. Keep the soil consistently moist and warm (around 70–75°F) during this time. Pro tip: If no sprouts appear after 6 months, gently check for rot—seeds may need fresh stratification.
Do I need to stratify Magnolia soulangeana seeds, or will they grow without it?
Stratification is critical for breaking dormancy. Without it, seeds may never sprout—or could take years! The layered chill method mimics winter conditions, tricking seeds into germinating. Skip it at your peril: Unstratified seeds often stay dormant indefinitely. Follow the 6–8 week cold treatment for best results.
Can I grow Magnolia soulangeana from seeds instead of buying a sapling?
Growing from seeds is rewarding (and budget-friendly), but expect slower growth and less predictable traits—seedlings may not match the parent’s vibrant colors or size. For guaranteed blooms, consider grafting or buying a young tree. Pro tip: If you’re impatient, layer seeds in pots and overwinter them outdoors for a head start!
Why are my Magnolia soulangeana seeds rotting during stratification?
Overly wet or poorly drained soil is the usual culprit. Use a 50/50 mix of perlite and peat moss to improve airflow, and avoid sealing containers airtight. If mold appears, act fast: Remove affected seeds, adjust moisture, and add a fungicide (like hydrogen peroxide) to the mix. Preventative tip: Use a spray bottle instead of soaking the medium.
Will my seed-grown Magnolia soulangeana bloom as early as a nursery tree?
Probably not! Seedlings typically take 5–10 years to flower, while grafted or mature trees may bloom sooner. Patience pays off—your tree will reward you with stunning Lilac Charm blooms eventually! Speed hack: Provide full sun, rich soil, and consistent watering to encourage faster growth.
Wrapping up and next steps
Growing Magnolia soulangeana from seeds using the layered chill method is a rewarding way to nurture these stunning bloomers for next spring! 🌱 With patience, the right tools, and a little care, you’ll be well on your way to cultivating your own fragrant, showy magnolias.
The key takeaway? Layering and cold stratification are your secret weapons—don’t rush the process!
Ready to take the next step? Once your seeds sprout, transplant them into well-draining soil and keep them in a sheltered spot until they’re strong enough for their permanent home. Happy gardening—your future magnolia grove awaits! 🌸