Watering
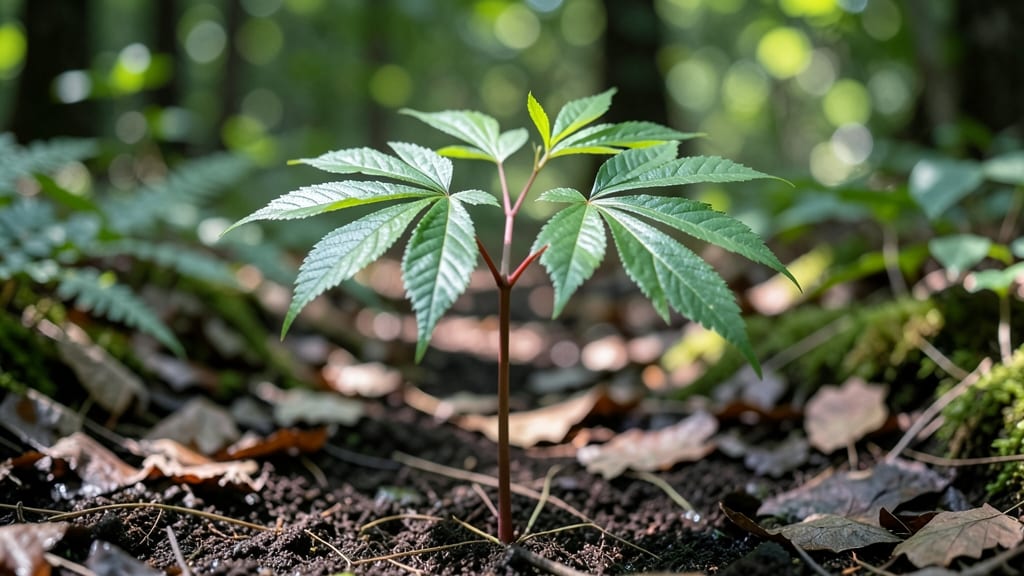
Removing poison sumac seedlings requires precision to stop regrowth before they spread toxic sap. 🌿 I learned this the hard way after a patch took over my property—now I share the exact root-out method that eliminates them for good.
The key is acting fast before seedlings mature, because once those red stems thicken, removal becomes far more difficult.
You’ll need heavy-duty gloves, long sleeves, and a sharp shovel or dandelion digger—never pull by hand. Poison sumac’s roots run deep, so dig at least 6 inches below the soil line to sever the taproot completely.
Bag the entire plant immediately; even broken stems release irritating oil that can cause rashes or blisters on contact.
What you’re left with is a sumac-free zone where safe native plants can thrive. The method works best in early spring before new growth appears, but if you spot seedlings later, containment with a thick mulch layer can suppress them until you’re ready to dig.
Always dispose of cuttings in sealed trash bags—never compost.
For large infestations or areas near water sources, call a professional. Poison sumac thrives in wet soil and can contaminate entire ecosystems, so when in doubt, err on the side of caution. The root-out method is your best defense against a plant that’s both persistent and dangerous.
📚 In This Guide
- What you need
- Instructions
- Tips and common mistakes
- Wrapping up and next steps
What you need
- ● Heavy-duty gloves (nitrile or rubber) – Thick (14+ mil) to protect against sap and thorns (1 pair).
- ● Safety goggles – ANSI-rated to shield eyes from debris (1 pair).
- ● Pruning shears or loppers – Bypass blades (7–10" length) for clean cuts (1 tool).
- ● Shovel or digging fork – Sturdy, 12–18" blade for root extraction (1 tool).
- ● Disposable trash bags (20+ gallon) – For sealed disposal of plant parts (2–3 bags).
- ● Rake or hoe – For clearing surrounding soil/roots (1 tool).
- ● Bleach or vinegar (1:1 ratio) – For sanitizing tools post-use (1 gallon or 32 oz spray bottle).
- ○ Plastic tarp (optional) – 6’x8’ to contain debris during removal.
- ● Weather check – Remove seedlings on a dry, wind-free day (avoid rain for 24–48 hours post-removal).
- ● Local regulations – Verify if poison sumac disposal requires special permits (call your county extension office).
- ● First-aid kit – Include antihistamines and calamine lotion (just in case!).
Step-by-Step instructions for poison sumac seedling removal
Here’s how to eliminate poison sumac seedlings safely and completely—no regrowth, no surprises.
🌱 Step 1: Identify and Mark the Seedlings
Poison sumac seedlings often look like tiny, glossy-leaved shrubs with 7-13 smooth-edged leaves per stem. Check damp areas, riverbanks, or shaded spots where they thrive. I wear long sleeves, gloves, and goggles—the sap causes rashes and blisters. Use a spray bottle filled with water to dampen the leaves before touching them; this prevents sap from spreading through the air.
Mark each seedling with a flag or stick to avoid missing any. I like to sketch a quick map of their locations if there’s a cluster. This ensures I don’t accidentally leave one behind, which can grow into a full plant within weeks. Watch for the red berries later in the season—they’re a dead giveaway for mature plants.
✂️ Step 2: Cut the Seedlings at the Base
Use loppers or pruning shears to slice each seedling 1-2 inches below ground level. This prevents the plant from sprouting again from the stem. I angle the cut slightly to expose more root tissue, which helps the remaining root dry out faster. Avoid tearing the stem—this can leave behind root fragments that regrow.
Dispose of the cuttings immediately in a sealed plastic bag. Never burn them—poison sumac smoke releases toxic fumes. I double-bag the clippings and label them clearly for disposal at a hazardous waste facility. If you’re working in a wooded area, drag a tarp behind you to collect any missed seedlings or debris.
💧 Step 3: Apply Herbicide to the Stump (Optional but Effective)
For stubborn seedlings, I apply a glyphosate-based herbicide directly to the fresh cut stump. Use a paintbrush for precision—this ensures the chemical reaches the root system. Follow the label instructions carefully, and avoid overspray on surrounding plants. I wait 24 hours before watering the area to allow the herbicide to absorb.
If you prefer a natural approach, I’ve had success with vinegar mixed with dish soap and salt (1 gallon vinegar, 1 cup salt, 1 tbsp soap). Spray it directly on the stump and cover it with plastic for 48 hours to enhance absorption. Check the area again in 2-3 weeks—any green shoots mean the root is still alive, and you’ll need to repeat the treatment.
🌿 Step 4: Monitor and Retreat as Needed
Poison sumac roots can survive for months, so patience is key. I return to the site every 2 weeks for the first 3 months, checking for new shoots. If you see any green growth, cut it off immediately and reapply herbicide or the vinegar solution. I’ve found that consistent monitoring catches regrowth before it becomes a problem.
After 3 months without new growth, the roots are likely dead. To be sure, I dig up a small section of soil around the original seedling spot. If the roots are brown and mushy, you’ve won. If they’re still firm and white, keep treating. This method ensures poison sumac stays gone for good—no more itchy rashes or unsightly plants.
Tips & tricks for poison sumac seedling removal
Getting rid of poison sumac seedlings requires precision—and a few smart tricks to ensure they never come back. Here’s what I’ve learned from dealing with these stubborn plants.
Safety First: The sap from poison sumac can cause severe skin irritation, so I double-check my protective gear before starting. Beyond gloves and long sleeves, I wear a long-sleeve shirt tucked into my pants and goggles to protect my eyes. After handling seedlings, I immediately wash my hands with soap and water to remove any residual sap. Trust me on this—skipping this step means risking painful rashes later.
The Cutting Technique: In Step 2, when you’re cutting the seedlings, aim for a clean, angled slice 1-2 inches below ground level. The angle exposes more root tissue, which speeds up the drying process and reduces the chance of regrowth. I’ve found that using a sharp pair of loppers makes all the difference—dull blades can tear the stem, leaving behind fragments that sprout anew.
Herbicide Timing: If you choose the chemical route, applying glyphosate to the fresh stump within minutes of cutting is key. The 24-hour wait before watering is crucial—it gives the herbicide time to penetrate the root system. For the natural vinegar solution, covering the stump with plastic for 48 hours traps moisture and intensifies the treatment. I’ve seen stubborn roots give up after this extended contact time.
Monitoring Strategy: The 2-week check-ins during the first 3 months might feel tedious, but they’re what separates success from failure. I mark my calendar with reminders and bring a small trowel to dig up any suspicious soil. If you spot even a tiny shoot, cut it off immediately and reapply treatment. Consistency is everything—roots can lie dormant for months before resurfacing.
Pro Tips for Poison Sumac Seedling
- Getting rid of poison sumac seedlings requires precision—and a few smart tricks to ensure they never come back. Here’...
- Safety First: The sap from poison sumac can cause severe skin irritation, so I double-check my protective gear before...
- The Cutting Technique: In Step 2, when you’re cutting the seedlings, aim for a clean, angled slice 1-2 inches below g...
Frequently asked questions
Got questions about identifying, removing, or avoiding poison sumac seedlings? You’re not alone! Here are answers to the most common concerns—so you can tackle this pesky plant with confidence.
How do I tell a poison sumac seedling apart from harmless sumac?
Look for hairy stems, 7–13 smooth-edged leaflets (vs. toothed edges in other sumacs), and a reddish tint when stressed. Poison sumac also grows in swamps or wet areas—never dry hillsides. When in doubt, snap a photo and check with your local extension office!
What’s the best time of year to remove poison sumac seedlings?
Target early spring (before leaves emerge) or late fall (after frost). Young seedlings are easiest to pull by hand or dig out when soil is soft. Avoid summer—mature plants release more urushiol oil (the irritant) when stressed, increasing your risk of rash or blisters.
Do I need protective gear when removing poison sumac seedlings?
Absolutely!
Wear long sleeves, gloves, and goggles—even seedlings contain urushiol. Spray the plant with soapy water first to break down the oil. After handling, wash clothes separately and shower with cool water and soap (hot water can drive urushiol deeper into skin).
Will poison sumac grow back if I don’t remove the roots?
Yes! Sumac spreads via underground roots and seed dispersal. To prevent regrowth, dig 6–12 inches deep to expose the taproot, then soak the stump with vinegar or herbicide (follow label instructions). Monitor the area for sprouts for 2+ years—they’re sneaky!
Are there natural alternatives to chemical herbicides for poison sumac?
Try these eco-friendly methods:
- Vinegar + dish soap: Mix 1 gallon vinegar + 1 oz soap, spray on cut stumps or seedlings (reapply weekly).
- Smothering: Cover the area with cardboard + mulch for 6+ months to block sunlight.
- Manual removal: Use a shovel or hoe in early spring when soil is moist.
Note: Natural methods take longer but reduce chemical exposure to pets/kids.
Wrapping up and next steps
Removing poison sumac seedlings early with the root-out method is your best defense against painful rashes and unwanted regrowth. By using the right tools—like gloves, pruners, and vinegar—and following safety precautions, you can protect your yard (and your skin!) long-term. Don’t wait until they’re towering—act now!
Ready to take action? Grab your gear, mark those seedlings, and start digging! 🌱💪 Your future self (and your plants) will thank you.