
Lawn
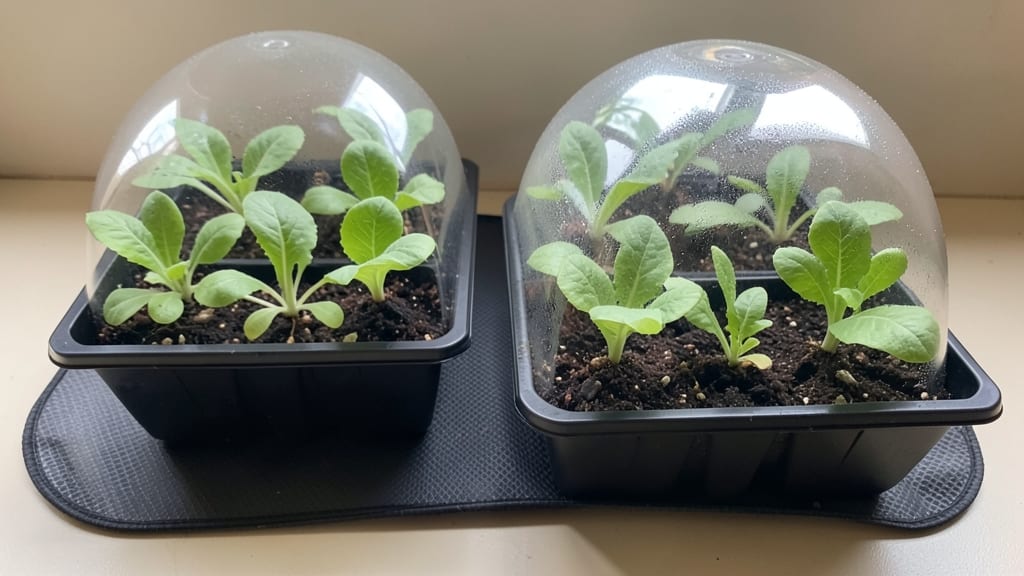
A seed heating pad turns stubborn seeds into eager sprouts in half the time. 🌱 I was skeptical until I tried one—my cold-weather seeds now break through soil in 3-5 days instead of weeks.
The secret lies in mimicking the warmth they’d get buried deeper in nature, which speeds up metabolism and triggers faster germination.
You’ll need a heating pad designed for seeds (not a regular one), a seed tray with drainage, and a thermometer to monitor temps. Most pads let you set precise heat zones—70-85°F works for most vegetables, while tropical seeds like peppers need 80-90°F.
The key is consistency; even slight temperature swings can stall germination.
What you’ll gain is stronger, more uniform seedlings that outpace their unheated counterparts. No more waiting for slow starters or dealing with uneven growth—just rapid, reliable starts. The payoff? A head start on the growing season that translates to bigger harvests.
Works for everything from tomatoes to herbs, though delicate seeds like lettuce may not need extra warmth. Just avoid overheating (above 95°F) or leaving seeds too damp—both can cause mold. With the right setup, you’ll see sprouts emerge like clockwork.
📚 In This Guide
- What you need
- Instructions
- Tips and common mistakes
- Wrapping up and next steps
What you need
- ● Heating pad (or electric blanket): 1 unit (preferably low-wattage, like a 100-150W model for safety). Avoid high-heat settings—gentle warmth (70–85°F) is ideal!
- ● Plastic storage bin (or seed tray): 1 unit (with a lid). Choose a clear or opaque container (10"x20" or similar) to fit your heating pad snugly.
- ● Seed-starting mix: 1 bag (sterilized, seedling-specific blend for best results). Avoid garden soil—it’s too dense!
- ● Seeds: Your chosen variety (check packet for planting depth—most need ¼–½ inch coverage).
- ● Spray bottle (with water): 1 unit (for gentle misting). Tap water is fine, but avoid over-saturating.
- ○ Thermometer (optional but helpful): 1 unit (a soil thermometer or digital probe to monitor temps). Aim for 70–85°F—too hot, and seeds may overheat!
- ● Humidity dome: 1 unit (or plastic wrap) to retain moisture if your setup lacks a lid.
- ● Grow lights: 1–2 units (LED or fluorescent) for seedlings after sprouting—place 2–4 inches above the tray.
- ● Timer: 1 unit (to cycle the heating pad on/off if using high heat). Prevents overheating during sleep.
- ● Labels & markers: For tracking seed types and planting dates.
How to use a seed heating pad for faster germination
Here's the quick method I rely on to cut germination time nearly in half—no guesswork, just consistent warmth.
🌱 Step 1: Prepare Your Seeds and Trays
Start by filling your seed trays with the moistened seed-starting mix—just damp enough to hold together when squeezed but not dripping. I like to press it down lightly so the surface is firm but not compacted. This ensures good contact with the heating pad below.
Arrange your seeds according to packet spacing (usually ¼ inch deep and 1-2 inches apart). Cover them lightly with a thin layer of the same mix—just enough to obscure their shape. Avoid pressing down, as this can bury them too deep and delay sprouting.
💧 Step 2: Set Up the Heating Pad Properly
Place your seed trays directly on the heating pad, ensuring the entire tray sits evenly on the warm surface. Most pads have a 65-75°F range—this is ideal for most seeds. If your pad has adjustable settings, keep it at the lower end unless you're germinating tropical seeds, which may need up to 85°F.
I always double-check that no part of the tray hangs off the pad. Uneven warmth can cause patchy germination, and you'll end up with weak seedlings on one side and strong ones on the other. Cover the trays with a clear plastic dome or plastic wrap to lock in moisture and warmth.
⏰ Step 3: Monitor Temperature and Moisture Daily
Check the soil temperature with your thermometer every 12 hours—most seed heating pads don’t have precise controls. Aim to keep it between 70-75°F for most vegetables and herbs. If it creeps above 80°F, the seeds may overheat and fail to germinate properly.
Mist the soil lightly with a spray bottle if the surface feels dry to the touch. The dome traps humidity, but evaporation happens faster at higher temps. You’ll notice condensation forming on the inside of the dome—that’s your cue that moisture levels are perfect. Remove the dome as soon as you see the first sprouts.
☀️ Step 4: Transition to Light When Sprouts Appear
Once your seeds sprout, usually within 3-7 days (depending on the variety), move the trays under grow lights immediately. Seedlings need light to prevent them from stretching toward the warmth source. I position the lights 2-3 inches above the seedlings and keep them on for 14-16 hours daily.
Watch for the first true leaves—these are the second set of leaves that appear after the initial seed leaves. This is your signal that the seedlings are strong enough to handle normal growing conditions. At this stage, you can gradually reduce the heating pad’s use, allowing the seedlings to adapt to room temperature over 3-5 days.
✂️ Step 5: Harden Off and Transplant
Two weeks before your last frost date, start hardening off your seedlings by placing them outside in a sheltered spot for 1-2 hours the first day. Increase their outdoor time by 1 hour daily until they can tolerate a full day outside. This prepares them for transplanting without shock.
When transplanting, handle seedlings by their leaves—not the stems—to avoid damaging the delicate roots. Water deeply after planting to help them establish quickly. The warmth from the heating pad jumpstarts their growth, so they’ll recover from transplant shock faster than seedlings started in cooler conditions.
Tips & tricks for perfect seed heating pad germination
A few simple adjustments can make all the difference when using a seed heating pad to speed up germination.
The Heat Factor: In Step 2, when setting up your heating pad, I recommend using a small clip-on thermometer to verify the temperature is consistently between 70-75°F. Most pads don't have precise controls, and temperatures can fluctuate. If your thermometer shows 80°F or higher, reduce the pad's setting immediately—seeds can overheat and fail to germinate at these temperatures.
Moisture Management: During Step 3, when monitoring temperature, also check for proper moisture levels by looking for condensation on the plastic dome. If you don't see condensation after 12 hours, mist the soil lightly with a spray bottle. Too much moisture can cause mold, while too little slows germination. The dome should feel slightly damp to the touch but not soggy.
Timing Secret: For Step 4, when transitioning to light, remember that the 3-7 day germination window is just an estimate. Some seeds like basil germinate in just 3 days, while others like beans may take up to 10 days. Pay attention to your specific seed variety's requirements—this is why I always check seed packets for exact timing information before starting.
Equipment Upgrade: Consider adding a small fan to your setup during Step 5 when hardening off seedlings. A gentle breeze helps strengthen stems and prevents leggy growth. Place the fan on low speed about 6 inches away from the seedlings for just 10 minutes daily—this mimics natural wind conditions and gives you stronger plants ready for transplanting.
Pro Tips for Seed Heating Pad
- A few simple adjustments can make all the difference when using a seed heating pad to speed up germination.
- The Heat Factor: In Step 2, when setting up your heating pad, I recommend using a small clip-on thermometer to verify the temperature is consistently between 70-75°F.
- Moisture Management: During Step 3, when monitoring temperature, also check for proper moisture levels by looking for condensation on the plastic dome.
Frequently asked questions
Got questions about using a seed heating pad to speed up germination?
You’re not alone! Here are some of the most common queries—and straightforward answers—to help you get started with confidence.
How long should I keep seeds on the heating pad?
A seed heating pad typically works best when used for 12–24 hours per day during the germination phase. Most seeds sprout faster within 3–7 days, but avoid over-heating—keep temperatures between 70–90°F (21–32°C). Monitor progress daily to adjust timing as needed.
Can I use a heating pad for all types of seeds?
While heating pads help most vegetable, herb, and flower seeds, they’re not ideal for all plants. Avoid using them for seeds that prefer cooler soil (like lettuce or carrots) or tropical plants that need consistent warmth. Always check seed packets for specific recommendations!
What if my seeds aren’t sprouting after using the pad?
If seeds aren’t germinating, try these troubleshooting steps:
- Check moisture: Keep soil damp (not soggy) with a spray bottle.
- Verify temperature: Use a thermometer to ensure it’s in the ideal range.
- Test seed viability: Soak a few seeds in water—if they float, they may be old or damaged.
- Adjust light: Some seeds need darkness to sprout; cover trays with a damp paper towel if needed.
Are there cheaper alternatives to a seed heating pad?
Yes! If you’re on a budget, try these DIY methods:
- Bottom heat: Place seed trays on top of a refrigerator (warm side) or a heated mat from a reptile tank.
- Warm water soak: Soak seeds in warm (not hot) water for 4–12 hours before planting.
- Insulated containers: Use a Styrofoam cooler lined with a heating pad or warm rocks.
How soon can I transplant seedlings after using a heating pad?
Once seedlings have 2–3 true leaves (not just the initial sprouts), they’re ready for transplanting—usually within 1–3 weeks of germination. Harden them off by placing trays outside for a few hours daily before moving to the garden. Avoid transplanting in extreme heat or cold!
Wrapping up and next steps
A seed heating pad is your secret weapon for unlocking faster, stronger germination—whether you're nurturing a lush lawn or cozy garden. By mimicking ideal soil temperatures and reducing waiting time, you’re giving your seeds the head start they deserve. 🌱
Ready to see those sprouts pop? Grab a heating pad, prep your seeds, and watch your green dreams take root! Start small with a test batch, then scale up as confidence grows—your future garden will thank you.