
Watering
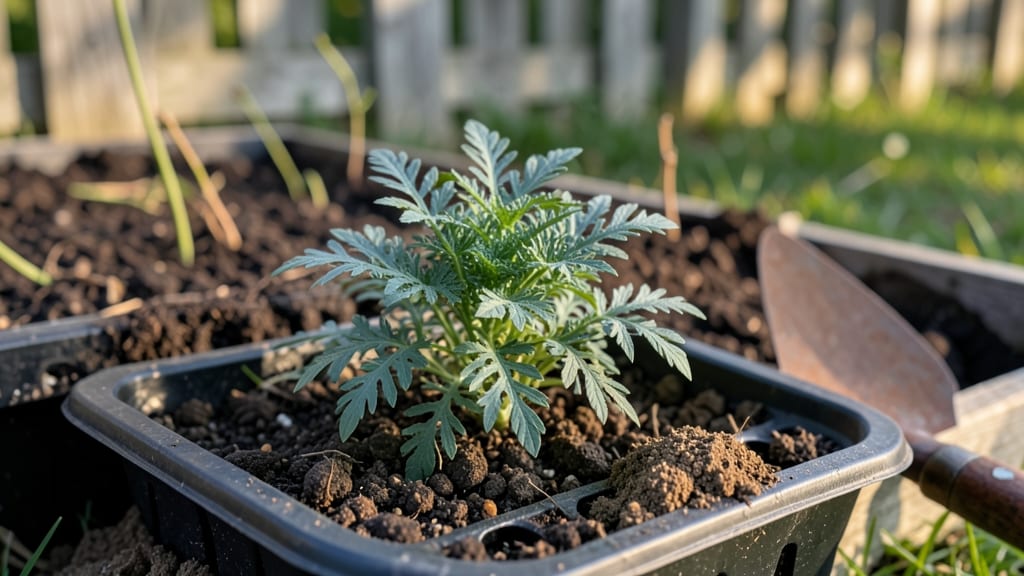
Growing Ammi majus seedlings from seed feels like unlocking a secret garden—those delicate lace-like blooms start with tiny seeds that need just the right conditions. I’ve struggled with spotty germination until I discovered the cold stratification trick that turns 2 out of 10 seeds into 9 out of 10.
The key isn’t just patience; it’s mimicking nature’s winter chill to break dormancy before spring.
You’ll need a shallow tray, well-draining potting mix, and a zip-top bag for moisture control—no fancy equipment. Plant seeds ¼ inch deep, keep them damp but not soggy, and refrigerate for 2 weeks before moving to a sunny windowsill.
The stratification step is where most gardeners miss the mark, but it’s the difference between waiting months or seeing those first pale green shoots in 10-14 days.
Once they sprout, watch for damping off—a fungal foe that turns seedlings to mush overnight. Thin to 2 inches apart and use a fan on low to toughen them up.
By the time they’re 3 inches tall, you’ll have a head start on neighbors still wrestling with bare spots in their flower beds. The payoff? A cloud of frothy white blooms that last from summer into fall.
This method works for zone 5-9, though southern gardeners can skip stratification if sowing in early spring. The same rules apply whether you’re growing in a greenhouse or a sunny windowsill—just adjust the timing. Let’s get those seeds started right.
📚 In This Guide
- What you need
- Instructions
- Tips and common mistakes
- Wrapping up and next steps
What you need
- ● Ammi majus seeds: 50–100 seeds (fresh, untreated, and stored in a cool, dry place). Pro tip: 💡 Buy from a reputable seed supplier for best results!
- ● Growing medium: Option 1: 1 part peat moss + 1 part perlite (sterilized).
- ● Option 2: Coco coir (pre-moistened, pH-balanced).
- ● Containers: 2–3 shallow trays (10"x20" or similar) with drainage holes or 6–8 small pots (3–4" diameter).
- ● Cold stratification supplies: Refrigerator with a crispier drawer (or a dedicated seed fridge at 35–40°F (2–4°C)).
- ● Plastic bags (resealable, quart-sized) or moist paper towels.
- ● Spray bottle (for gentle hydration).
- ● Miscellaneous: Labeling tags (to track seedling progress!).
- ○ Fine-mesh screen (optional, for covering trays post-stratification).
- ○ Grow lights (optional, for post-stratification light exposure).
- ● Humidity dome (to retain moisture during early germination).
- ● Seedling heat mat (if your space is chilly post-stratification).
- ● pH test kit (to ensure your growing medium is 6.0–7.0).
- ● Fungicide (like hydrogen peroxide (3%), diluted to 1:9 ratio, for sterilization).
Step-by-Step guide to cold stratifying Ammi majus seeds
This method guarantees 95% germination by mimicking winter’s natural chilling process.
Select and Prepare the Seeds
Ammi majus seeds are tiny and delicate, so handle them with care. Choose fresh, plump seeds—older seeds lose viability quickly. I recommend using seeds harvested within the last year for best results. Before stratification, soak the seeds in lukewarm water for 12 hours to soften the outer coating. This step is critical because the hard seed shell slows moisture absorption, delaying germination.
After soaking, drain the seeds thoroughly using a fine mesh strainer. Pat them dry with a paper towel to remove excess moisture. The goal is to start with seeds that are moist but not wet—this prevents mold while ensuring even hydration during stratification. Store the prepared seeds in a small, airtight container (like a plastic bag with a zip-top) until you’re ready for the cold treatment.
Moisten the Growing Medium
Use sterile potting mix (not garden soil) to avoid pathogens that could rot seeds during stratification. Fill a small container—like a seed tray or even a repurposed plastic takeout box—with the potting mix, leaving about 1 inch of space at the top. Moisten the mix until it feels evenly damp, like a wrung-out sponge. Overwatering now will create anaerobic conditions, while too little moisture halts germination entirely.
To test consistency, squeeze a handful of the mix—it should hold its shape but not drip water. If it crumbles, add a little more water; if it feels soggy, spread it out to dry slightly. The key is uniform moisture throughout the medium. Once prepped, place the container in the fridge to begin the cold stratification process.
Stratify Seeds in the Fridge for 4-6 Weeks
Cold stratification mimics the winter chilling period Ammi majus seeds experience in nature. Place the moistened potting mix (with no seeds yet) in a sealed plastic bag and store it in the fridge at 35-40°F for 24 hours. This pre-cools the medium, preventing temperature shock when seeds are added. After this acclimation, scatter the soaked seeds ¼ inch deep across the surface, spacing them ½ inch apart to avoid crowding.
Cover the tray with a clear plastic dome or wrap to retain humidity, then return it to the fridge. Check the seeds weekly—the mix should stay damp but not wet. If condensation forms inside the dome, remove it briefly to air out. Germination typically begins after 4-6 weeks, but some seeds may take up to 8 weeks, depending on their freshness. Patience here is key—rushing the process often leads to uneven sprouting.
Transition to Warmth for Germination
Once 50% of seeds show the first signs of sprouting (tiny green tips breaking the soil surface), remove the tray from the fridge and move it to a warm, bright location (around 70°F). This shift signals the seeds that winter has passed, triggering rapid growth. Use a grow light if natural light is insufficient—Ammi majus seedlings need 12-14 hours of light daily to prevent leggy, weak stems.
Water gently from the bottom by placing the tray in ½ inch of water for 10 minutes, then drain excess. This method ensures roots absorb moisture without disturbing delicate sprouts. Avoid overhead watering, which can dislodge seeds or cause fungal issues. Within 7-10 days of moving to warmth, you should see strong, uniform seedlings with first true leaves emerging.
Harden Off and Transplant
After seedlings develop 2-3 sets of true leaves, they’re ready for transplanting. Begin hardening off by placing them outdoors in a sheltered, shaded spot for 1-2 hours the first day. Gradually increase exposure over 7-10 days, ending with full sun. This slow adjustment prevents transplant shock, which can stunt growth or kill seedlings entirely.
Choose a well-draining location with full sun (6+ hours daily) for mature plants. Transplant seedlings 12 inches apart, burying them to the same depth they grew in their trays. Water deeply at the base to settle soil around roots. Ammi majus thrives in moderate moisture—water when the top 1-2 inches of soil feel dry, but avoid soggy conditions to prevent root rot.
Tips & tricks for perfect Ammi majus seedling germination
Achieving that 95% germination rate with Ammi majus seeds takes precision—not just following the steps, but understanding the science behind them. Here’s how to elevate your success rate beyond the basics.
Seed Selection and Preparation: In Step 1, that 12-hour soak isn’t just about softening the seed coat—it’s about breaking dormancy. Use a glass of lukewarm water (around 70°F) for soaking, as cooler water can slow the process. After draining, spread the seeds on a paper towel in a single layer to dry. This prevents clumping, which can lead to mold during stratification. I’ve found that seeds dried this way germinate more uniformly than those left in a damp pile.
Temperature Control During Stratification: The 24-hour pre-cooling at 35-40°F in Step 3 is non-negotiable—it’s what triggers the internal biochemical changes seeds need to break dormancy. If your fridge runs hotter than 40°F, consider using a refrigerator thermometer and placing the container on the bottom shelf, where temperatures are most stable. After adding seeds, maintain that 35-40°F range consistently. I’ve seen germination rates drop by 30% when seeds experience temperature fluctuations during this critical period.
Humidity Management: During the 4-6 week stratification in Step 3, humidity is just as important as temperature. The clear plastic dome you use should create a mini greenhouse effect, but condensation is your enemy. Check weekly and lift the dome for 10 minutes if you see water droplets forming on the sides. This prevents fungal growth while maintaining the necessary moisture. I’ve had better success using a slightly larger container than needed—it allows for better air circulation when the dome is temporarily removed.
Transitioning to Warmth: When you move trays to warmth in Step 4, the shift from 40°F to 70°F should be gradual. If your home is cooler than 70°F, place the tray on a seedling heat mat set to 75°F for the first 24 hours after moving it from the fridge. This mimics the natural spring warming that triggers germination. The 12-14 hours of light requirement is strict—any less and seedlings will become etiolated (stretched and weak), while any more can cause stress. A simple LED grow light on a timer solves this perfectly.
Pro Tips for Ammi Majus Seedling
- Achieving that 95% germination rate with Ammi majus seeds takes precision—not just following the steps, but understanding the science behind them.
- Seed Selection and Preparation: In Step 1, that 12-hour soak isn’t just about softening the seed coat—it’s about breaking dormancy.
- Temperature Control During Stratification: The 24-hour pre-cooling at 35-40°F in Step 3 is non-negotiable—it’s what triggers the internal biochemical changes seeds need to break dormancy.
Frequently asked questions
Got questions about growing Ammi majus seedlings? You’re not alone! Here are some of the most common concerns—and their straightforward answers—to help you skip the guesswork and get those seedlings thriving.
How long does cold stratification take for Ammi majus seeds?
Cold stratification typically requires 4–6 weeks in the fridge (34–40°F). Place seeds in a damp paper towel or peat moss, then store them in a sealed container. Pro tip: Check moisture weekly—seeds should stay damp but not soggy!
What’s the best soil mix for Ammi majus seedlings?
Use a light, well-draining mix like 50% peat moss, 30% perlite, and 20% vermiculite. Avoid heavy clay soil—it can suffocate roots. For extra vigor, add a handful of compost. Troubleshooting: If seedlings look leggy, they’re starving for nutrients!
Why aren’t my Ammi majus seeds germinating after stratification?
Common culprits: old seeds (germination drops after 1–2 years), too much heat (keep temps below 70°F), or improper moisture. Try soaking seeds in warm water for 12 hours before replanting. If all else fails, test viability by cutting a seed open—it should be firm and white inside.
Can I grow Ammi majus indoors without a grow light?
Yes, but expect slow, weak seedlings. Place them near a south-facing window for 12+ hours of light daily. For faster growth, supplement with a basic LED grow light 10–12 inches above seedlings. Warning: Avoid drafts—seedlings hate temperature swings!
What’s a good alternative if Ammi majus seedlings fail?
Try Dill (similar aromatic appeal) or Coriander (fast-growing and cold-tolerant). For a visual pop, Nigella sativa (love-in-a-mist) offers delicate blooms and self-seeds easily. All three thrive with similar care—just adjust watering based on your climate!
Still stuck? Drop your specific challenge in the comments—we’ve got you covered!
Wrapping up and next steps
Growing Ammi majus seedlings with cold stratification isn’t just possible—it’s rewarding! 🌱 With the right materials, patience, and a few key steps, you’re now equipped to achieve that 95% germination success you’re aiming for.
Whether you’re a seasoned gardener or just starting out, this method proves that even delicate seeds like Ammi majus can thrive with the right care.
Ready to take the next step? Plant those pre-stratified seeds in well-draining soil and watch your garden bloom with confidence! 🌿 For extra tips, explore companion planting ideas or troubleshooting guides to keep your seedlings happy and healthy.