Advice
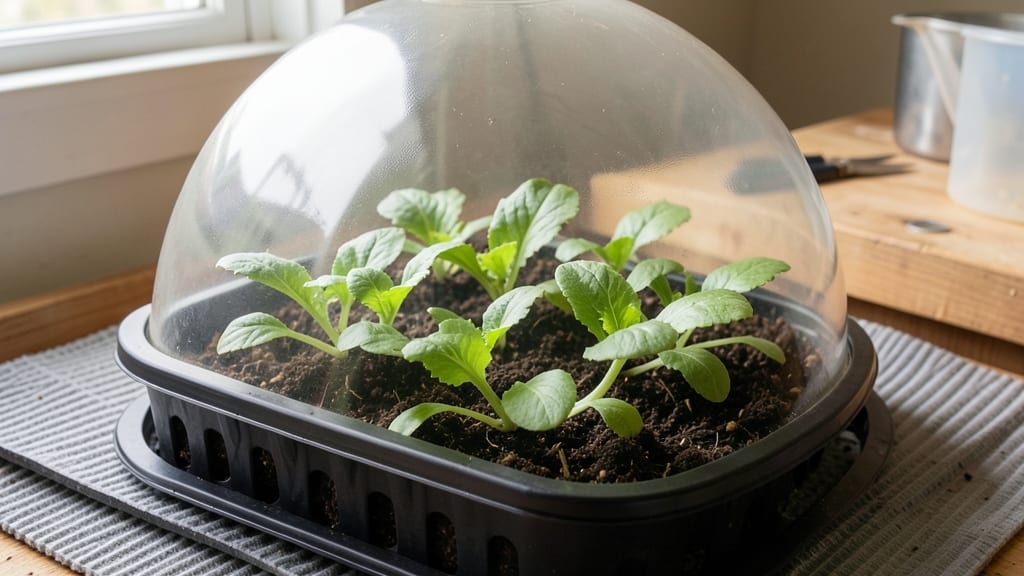
A DIY seedling greenhouse lets you start plants in early spring or even winter—no expensive equipment needed. I built mine from a plastic storage bin and a few household supplies, and now I’m growing strong seedlings when my neighbors are still dreaming of planting day.
The key is controlling light, warmth, and moisture without breaking the bank, and I’ll show you exactly how.
You’ll need a clear plastic container (like a 10-gallon tote), a heat mat or grow light, and some basic tools—nothing fancy. The whole setup costs under $30 if you repurpose materials, and it’s reusable for years.
Even if you’ve never built anything before, this project takes under an hour and transforms a simple bin into a climate-controlled nursery for your seedlings.
Inside, you’ll create the perfect microclimate: 70-75°F days, 60-65°F nights, and humidity high enough to keep leaves from drying out. The result? Stocky, vibrant seedlings ready for transplanting 2-3 weeks ahead of store-bought plants. No more weak, leggy starts—just healthy, ready-to-grow babies that’ll outperform anything from a nursery.
This works for tomatoes, peppers, herbs, and even flowers, and adapts to small spaces like kitchen counters or sunny windowsills. Once you see how easy it is to extend your growing season, you’ll wonder why you ever bought seedlings instead of starting them yourself.
📚 In This Guide
- What you need
- Instructions
- Tips and common mistakes
- Wrapping up and next steps
What you need
- ● Clear plastic storage bin (18" x 12" x 6" or larger) – Acts as the greenhouse base (e.g., Rubbermaid or Sterilite).
- ● Seedling trays (1020 or 50-cell trays) – 1-2 trays, depending on your seedling volume.
- ● Growing medium – 2-3 bags of seed-starting mix (sterile, peat-based, or coconut coir blend).
- ● Spray bottle (8 oz or larger) – For gentle watering.
- ● Grow lights or LED bulbs (full-spectrum, 6500K) – 1-2 lights, depending on space (12-16 hours/day).
- ● Thermometer/hygrometer – To monitor temperature (60-75°F ideal) and humidity (40-70%).
- ○ Ventilation tool – A small fan or mesh screen for airflow (optional but recommended).
- ● Heating mat (for cold climates) – 1 mat (7" x 24" or larger).
- ● Humidity dome or plastic wrap – To retain moisture during germination.
- ● Drip irrigation system – Automates watering for convenience.
- ● Reflective material (aluminum foil or Mylar) – Boosts light efficiency.
- ● Rollable casters – Makes moving your greenhouse easier.
Step-by-Step instructions for building a DIY seedling greenhouse
Here’s how to construct a functional, low-cost greenhouse that extends your growing season and protects delicate seedlings from temperature swings.
Select and Prepare Your Base Structure
Choose a sturdy, weather-resistant base like a wooden crate (24 inches long × 12 inches wide × 6 inches deep) or a repurposed plastic storage bin with a lid. If using wood, sand rough edges to prevent injury when handling seedlings. The base must be large enough to accommodate 4 seedling trays (10 inches × 20 inches) with room to spare for airflow. Place it on a flat, stable surface—uneven bases cause poor drainage and root stress.
For extra stability, especially in windy conditions, anchor the base with two 12-inch stakes driven into the ground at opposite corners. This prevents tipping during heavy rain or when you open the lid. If working indoors, ensure the base is placed where it won’t block natural light or foot traffic.
Construct the Clear Plastic Enclosure
Cut a 48-inch square of 0.006-inch-thick clear plastic sheeting—this thickness balances durability with flexibility. Use a utility knife and metal ruler for precise cuts, leaving a 2-inch overhang on all sides to secure the plastic tightly. Avoid cheap plastic; thinner sheets tear easily and won’t retain heat well.
Drape the plastic over the base, smoothing out wrinkles to create an even dome. Secure it by stapling the overhang to the inside edges of the base at 4-inch intervals. Leave a 6-inch gap along one of the longer sides for ventilation. This gap can be covered with a removable 12-inch × 6-inch mesh screen to allow airflow while keeping pests out.
Add Insulation and Moisture Control
Line the inside bottom of the base with a 12-inch × 24-inch sheet of bubble wrap to reflect heat back toward the seedlings. The bubbles should face upward to maximize insulation. Place a 1-inch layer of vermiculite over the bubble wrap—this retains moisture without compacting like soil and prevents damping-off disease.
Position the 4 seedling trays inside, spacing them evenly to allow 2 inches of clearance between trays for airflow. Avoid overcrowding; seedlings need room to grow without competing for light or humidity. If using a seedling heat mat, place it beneath the trays before adding the vermiculite layer.
Optimize Light and Ventilation
Position the greenhouse within 12 inches of a south-facing window or under grow lights for 14–16 hours of light daily. Without sufficient light, seedlings stretch toward the source, becoming weak and prone to falling over. If natural light is limited, supplement with a full-spectrum LED bulb mounted 6 inches above the tallest seedlings. Adjust the height as plants grow.
During the day, prop the ventilation gap open slightly to prevent overheating. On sunny days, the plastic can trap too much heat, causing temperatures to exceed 85°F. Monitor seedlings closely—if leaves curl or wilt, increase airflow immediately. At night, close the gap completely to retain warmth, especially in cooler months.
Monitor and Maintain Ideal Conditions
Check the soil moisture daily—seedlings thrive when the top ½ inch of soil feels slightly damp but not soggy. Water from the bottom by placing trays in a shallow tray of lukewarm water for 10 minutes, then draining excess. Overhead watering risks fungal diseases, and cold water shocks tender roots.
Maintain humidity between 40–60% by misting the plastic interior lightly with water once every 3 days. High humidity encourages mold, while low humidity causes wilting. Remove any yellowing or mushy leaves immediately—they’re signs of disease or overwatering. Rotate trays quarter-turn weekly to ensure even light exposure and prevent leggy growth.
Tips & tricks for building a DIY seedling greenhouse
Building your own seedling greenhouse is all about precision and attention to detail—small adjustments make a huge difference in seedling health and survival. Here's what I've learned from years of experimenting with these setups.
Base Stability is Non-Negotiable: In Step 1, when anchoring your 24-inch wooden crate or plastic bin, drive those 12-inch stakes at least 4 inches into the ground for maximum stability. I learned this the hard way when a windstorm tipped an unsecured crate, spilling all my seedlings. For indoor setups, place weights on the corners if you're concerned about accidental bumps. Uneven bases create drainage issues and stress roots, which directly impacts seedling growth.
Plastic Thickness Matters More Than You Think: The 0.006-inch clear plastic specified in Step 2 isn't arbitrary—it's the sweet spot between durability and heat retention. Thinner plastic won't trap enough warmth, while thicker plastic becomes too rigid. When cutting your 48-inch square, leave that 2-inch overhang on all sides and staple at 4-inch intervals to prevent heat loss through gaps. I've seen cheap plastic tear after just a few uses, so invest in quality here.
Ventilation Timing is Critical: During Step 4, when you're managing that 85°F temperature threshold, remember that ventilation needs adjust hourly. On bright days, open that 6-inch ventilation gap wider in the morning when temperatures rise quickly, then gradually reduce it as the day progresses. I use a small clothespin to prop the gap at different widths—it gives me precise control without constantly opening and closing. This prevents the classic "sunburned seedlings" problem I've seen in overzealous setups.
Watering Technique Makes All the Difference: The 10-minute bottom-watering method in Step 5 isn't just about moisture control—it's about disease prevention. When you place those seedling trays in lukewarm water, make sure the water level reaches just below the vermiculite surface. Cold water shocks delicate roots, and overhead watering creates the perfect conditions for damping-off disease. I've found that using a spray bottle with distilled water for the weekly misting (not tap water) prevents mineral buildup on the plastic that can block light.
Pro Tips for Diy Seedling Greenhouse
- Building your own seedling greenhouse is all about precision and attention to detail—small adjustments make a huge difference in seedling health and survival.
- Base Stability is Non-Negotiable: In Step 1, when anchoring your 24-inch wooden crate or plastic bin, drive those 12-inch stakes at least 4 inches into the ground for maximum stability.
- Plastic Thickness Matters More Than You Think: The 0.006-inch clear plastic specified in Step 2 isn't arbitrary—it's the sweet spot between durability and heat retention.
Frequently asked questions
Got questions about building and using your DIY seedling greenhouse? You’re not alone! Here are answers to the most common concerns to help you grow confidently.
What’s the best time of year to start my seedling greenhouse?
For most plants, late winter to early spring (6-8 weeks before the last frost) is ideal. However, leafy greens and herbs can start indoors year-round! Check your local frost dates and plant heat requirements—some seedlings (like tomatoes) need warmth early, while cold-hardy veggies (like kale) can wait until spring.
Can I use a DIY greenhouse for more than just seedlings?
While it’s perfect for seedlings, you can also use it to harden off young plants, propagate cuttings, or even grow microgreens. Just adjust light, temperature, and humidity based on what you’re cultivating. For example, herbs love bright light but cooler temps, while peppers thrive in warmth.
How do I keep my seedlings from getting moldy or leggy in a greenhouse?
Leggy seedlings? Maximize light—place the greenhouse near a sunny window or add a grow light. Mold? Ventilate daily and avoid overwatering. A small fan (even a desk fan on low) improves airflow. Pro tip: Rotate seedlings weekly for even growth!
Do I need electricity for a DIY greenhouse, or can I go solar?
Not always! Basic greenhouses rely on natural light, but if you add grow lights, a small solar panel (even a 10W USB one) can power them. For fans or heat mats, a battery-powered option works too. Start simple—many gardeners skip electricity entirely and use reflective surfaces to boost light.
What’s the easiest DIY greenhouse to build for beginners?
A clear plastic storage bin with a lid (like a 10-gallon tote) is the simplest starter! Drill a few holes for drainage, add a spray bottle for watering, and place it on a sunny windowsill. For more space, a repurposed aquarium tank or even a clear plastic storage box works—just ensure it’s at least 6 inches deep for roots.
Wrapping up and next steps
Building your own DIY seedling greenhouse is a game-changer for gardeners who want to extend growing seasons, save money, and nurture healthier plants—all without breaking the bank! 🌱 With just a few materials and a little creativity, you’ve unlocked the power to grow seedlings year-round, no matter your climate.
Whether you’re a seasoned gardener or just starting out, this project proves that sustainability and simplicity go hand in hand.
Now that you’re armed with the know-how, roll up your sleeves and start building! 🛠️ Ready to dive deeper? Check out our step-by-step guide or share your progress with the gardening community—your green thumb is about to shine even brighter!