
Propagation
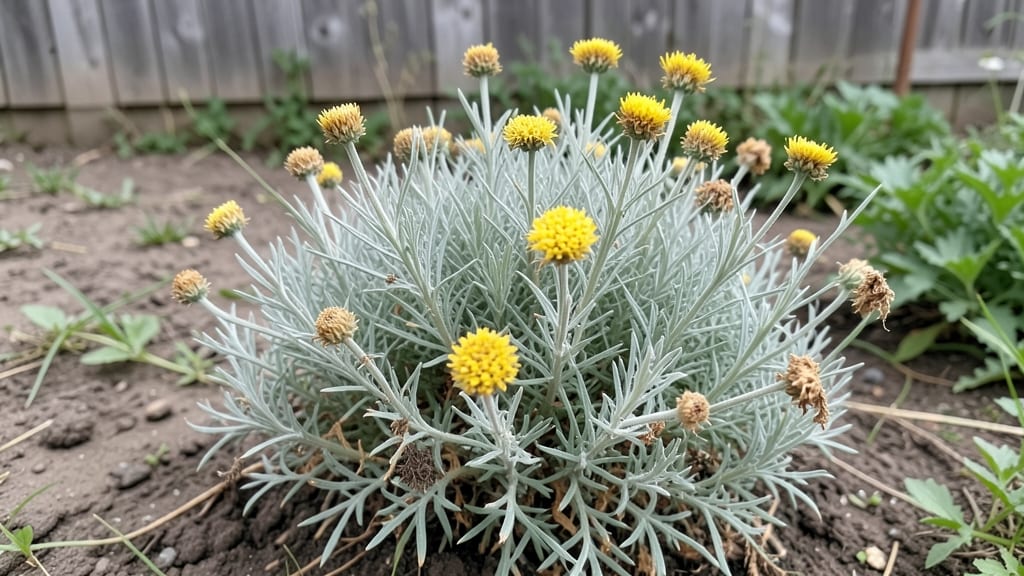
Growing helichrysum italicum seeds transforms your garden into a sun-drenched Mediterranean escape in just three months. 🌿 I've watched these delicate seedlings turn into silvery foliage bushes that smell like the Italian countryside—all from a tiny packet of seeds.
The key lies in mimicking their native climate: warm soil, bright light, and patience that pays off with drought-resistant plants perfect for borders or containers.
You'll need a sunny spot with well-draining soil, a seed-starting mix, and a warm location—whether that's a greenhouse, sunny windowsill, or heated mat. The seeds are tiny but tough; they germinate best when kept consistently moist but never soggy.
Once sprouted, thin seedlings to 12 inches apart—they'll grow slowly at first but reward you with that signature silvery foliage by early summer.
By month three, you'll have fragrant, everlasting foliage that repels pests and thrives on neglect. The plants stay compact, perfect for edging or spilling over container edges. Their drought tolerance makes them ideal for low-maintenance gardens, and the silvery leaves add texture that pops against any backdrop.
The best part? They keep producing fresh growth all season long.
This method works equally well for garden beds, large containers, or even balcony planters. Whether you're reviving a tired border or adding Mediterranean flair to a small space, helichrysum italicum delivers results that outlast any other annual. Let's get those seeds started right!
📚 In This Guide
- What you need
- Instructions
- Tips and common mistakes
- Wrapping up and next steps
What you need
- ● Helichrysum italicum seeds: 10–20 seeds (fresh or stored in a cool, dry place for up to 2 years). Pro tip: 💡 Buy from a reputable supplier for the best germination rates!
- ○ Seed-starting trays or small pots: 2–4 (3–4 inches deep) with drainage holes. Optional: Biodegradable peat pots for easy transplanting.
- ● Well-draining potting mix: 2–3 cups of a blend designed for succulents or herbs (e.g., 50% cactus/succulent mix + 50% perlite or sand). Why? Helichrysum hates soggy roots!
- ● Spray bottle or fine-mist watering can: For gentle hydration—no heavy-handed watering here!
- ● Clear plastic wrap or humidity dome: To create a mini greenhouse effect.
- ● Grow lights or sunny windowsill: A south-facing window or LED grow lights (12–16 hours/day) for optimal growth.
- ● Plant labels: To track seedling progress (trust us, they’ll look different at every stage!).
- ● Seedling heat mat: Keeps soil warm (70–75°F) for faster germination.
- ● Fertilizer: A balanced, water-soluble fertilizer (5-5-5 or 10-10-10) diluted to half-strength for seedlings.
- ● Tweezers or toothpick: For gently pressing seeds into the soil.
- ● Pruning shears: For trimming leggy seedlings later on.
- ● Outdoor hardening-off tray: If you plan to transplant outside after 3 months.
How to grow helichrysum italicum from seeds in containers
This sun-loving Mediterranean beauty thrives in containers—here's how to coax those delicate silver foliage and golden blooms from tiny seeds.
🌱 Step 1: Prepare Containers and Seed Starting Mix
Fill your 4-inch diameter containers with 2 gallons of sterile seed-starting mix—this herb despises compacted soil. I press the mix down gently to remove air pockets, then moisten it until it feels like a damp sponge. Helichrysum seeds need excellent drainage, so I add a handful of perlite to each container before planting. The mix should be loose enough that your finger sinks in easily but doesn't clump together.
Place the containers in a warm spot (70-75°F) since helichrysum seeds germinate best with bottom heat. I use a seedling heat mat under my propagation tray—this prevents the chill that often delays germination. Here's the thing—don't skip the warmth. Without it, those tiny seeds might take 3-4 weeks to sprout instead of the 10-14 days you'll get with consistent warmth.
💧 Step 2: Sow Seeds and Maintain Humidity
Sprinkle 10-15 seeds across the surface of each container—helichrysum seeds are so small they barely register. Press them lightly into the mix with your fingertip (no deeper than ¼ inch), then mist the surface with a spray bottle until the soil looks uniformly damp. I cover the containers with clear plastic wrap to create a greenhouse effect, which keeps humidity high and prevents the soil from drying out too quickly.
Check daily for condensation on the plastic—this tells you the humidity is perfect. Remove the wrap immediately if you see mold or black spots developing. Place the containers in bright, indirect light (no direct sun yet). You'll see the first tiny sprouts in 7-10 days, but be patient—some seeds may take up to 21 days to germinate. Once you spot 50% germination, remove the plastic completely to prevent fungal issues.
☀️ Step 3: Provide Full Sun and Gradual Hardening
When seedlings show their first true leaves (not the initial cotyledons), move them to a south-facing window or under grow lights providing 12-14 hours of light daily. Helichrysum italicum craves full sun, but young plants need to acclimate gradually. I start with 2-3 hours of morning sun, then increase exposure by 1 hour daily until they're getting 6+ hours of direct sunlight. You'll notice the leaves turning a deeper silver-green as they adapt—this is your cue they're thriving.
After 4 weeks, begin the hardening process. Place the containers outside in a sheltered spot for 1 hour the first day, then gradually increase their outdoor time over 10 days. Watch for leaves that look slightly wilted—they're telling you they need more time to adjust. Once they're handling full sun without wilting, they're ready for their permanent container.
🪴 Step 4: Transplant to Permanent Containers
Choose 6-inch diameter containers for your mature helichrysum plants—these give roots room to spread without becoming root-bound. Fill each with 3 gallons of well-draining potting mix (I blend 60% potting mix with 40% coarse sand for extra drainage). Gently remove each seedling, being careful not to disturb the root ball, and place it in the new container at the same depth it was growing before. Firm the soil around the base and water thoroughly.
Here's where it gets fun—helichrysum italicum grows slowly but steadily. In 3 months, you'll see those classic silver foliage and golden button-like flowers emerge. The key now is consistent watering—let the top 1 inch of soil dry out between waterings, but never let the roots sit in soggy soil. This Mediterranean native hates wet feet and will throw a fit by dropping leaves if overwatered.
Tips & tricks for perfect helichrysum italicum growth
These game-changing tips will help you transform those tiny helichrysum seeds into stunning silver foliage and golden blooms—without the common pitfalls that trip up even experienced gardeners.
Warmth is Non-Negotiable: That 70-75°F temperature range in Step 1 isn't just a suggestion—it's the secret weapon for fast germination. I've seen seeds take 3-4 weeks to sprout when kept at room temperature (around 68°F) instead of the 10-14 days with proper warmth. Invest in a seedling heat mat if your home runs cooler—it's the difference between success and frustration. The moment you notice condensation forming on the plastic wrap, you'll know you've hit the perfect humidity-warmth balance.
Seed Placement Precision: When sowing those 10-15 seeds in Step 2, think "lightly pressed, not buried." Helichrysum seeds need light to germinate, so pressing them just enough to make contact with the soil is key. I use my fingertip to create tiny dimples—just enough to keep them from floating away when I mist. Pro tip: Sprinkle them on a dark background (like a piece of black paper) to see exactly where you're placing each one—those seeds are microscopic!
Light Transition Strategy: The gradual sun exposure in Step 3 is where most beginners make their first mistake. Start with those 2-3 hours of morning sun and watch for the leaves' reaction like a hawk. If they look slightly wilted but perk up after a few hours, they're telling you they need more time. I've seen plants go from vibrant to crispy in a single day when moved too quickly to full sun. The silver foliage will deepen as they acclimate—this visual cue means you're doing it right.
Drainage is Everything: That 60% potting mix to 40% coarse sand ratio in Step 4 isn't just about drainage—it's about preventing root rot. Helichrysum italicum comes from Mediterranean climates where water is scarce, not abundant. If you notice leaves yellowing or dropping, it's almost always a sign of overwatering. Stick your finger in the soil—if the top 1 inch feels dry, it's time to water. If it's still damp, wait another day. This plant will forgive you for underwatering but never for soggy roots.
Pro Tips for Helichrysum Italicum Seeds
- These game-changing tips will help you transform those tiny helichrysum seeds into stunning silver foliage and golden blooms—without the common pitfalls that trip up even experienced gardeners.
- Warmth is Non-Negotiable: That 70-75°F temperature range in Step 1 isn't just a suggestion—it's the secret weapon for fast germination.
- Seed Placement Precision: When sowing those 10-15 seeds in Step 2, think "lightly pressed, not buried."
Frequently asked questions
Got questions about growing Helichrysum italicum from seeds?
You’re not alone! Here are answers to the most common queries to help you cultivate this fragrant Mediterranean beauty with confidence.
How long does it take for helichrysum italicum seeds to germinate?
Germination typically takes 2–4 weeks in warm, moist conditions (70–75°F). Patience is key—some seeds may take longer, especially if soil temps dip below 60°F. For faster results, use a heat mat or propagate indoors under grow lights. Pro tip: Keep soil consistently damp (not soggy) to avoid mold.
When is the best time to plant helichrysum italicum seeds?
Start seeds indoors 8–10 weeks before your last frost date (early spring) for transplanting outdoors after danger of frost has passed. If sowing directly outside, wait until soil temps reach 60°F+ (late spring/early summer). Avoid fall planting—seeds need warmth to sprout.
Can I grow helichrysum italicum from seeds if I live in a cold climate?
Yes! While it thrives in USDA Zones 7–10, cold-climate gardeners can:
- Start seeds indoors under grow lights.
- Use container gardening to move plants indoors during winter.
- Choose slow-release fertilizer to boost resilience.
What if my helichrysum italicum seeds don’t sprout?
Try these fixes:
- Check seed viability: Soak seeds in warm water for 24 hours—if they sink, they’re likely good.
- Adjust soil mix: Use a well-draining, sandy loam (or add perlite).
- Light exposure: Seeds need bright, indirect light (no direct sun until sprouts appear).
- Stratification trick: Chill seeds in the fridge for 2 weeks before planting to mimic winter.
Are there alternatives to growing from seeds?
If seeds seem tricky, consider:
- Cuttings: Snip healthy stems (4–6 inches), remove lower leaves, and root in water or perlite.
- Transplants: Buy young plants from nurseries (check for Helichrysum italicum labels).
- Layering: Bend a low branch to the ground, cover with soil, and wait for roots to form.
Wrapping up and next steps
Growing helichrysum italicum seeds is a rewarding journey that brings the fragrant beauty of the Mediterranean right to your garden! 🌱 With patience, the right conditions, and a little care, you’ll soon enjoy lush, aromatic plants in just three months.
Whether you’re drawn to its culinary, medicinal, or ornamental uses, this herb is a versatile addition to any space.
Ready to take the next step? Start by gathering your supplies, then dive into planting—your future helichrysum italicum awaits! 🌿 Recap the essentials here before you begin.