
Pests
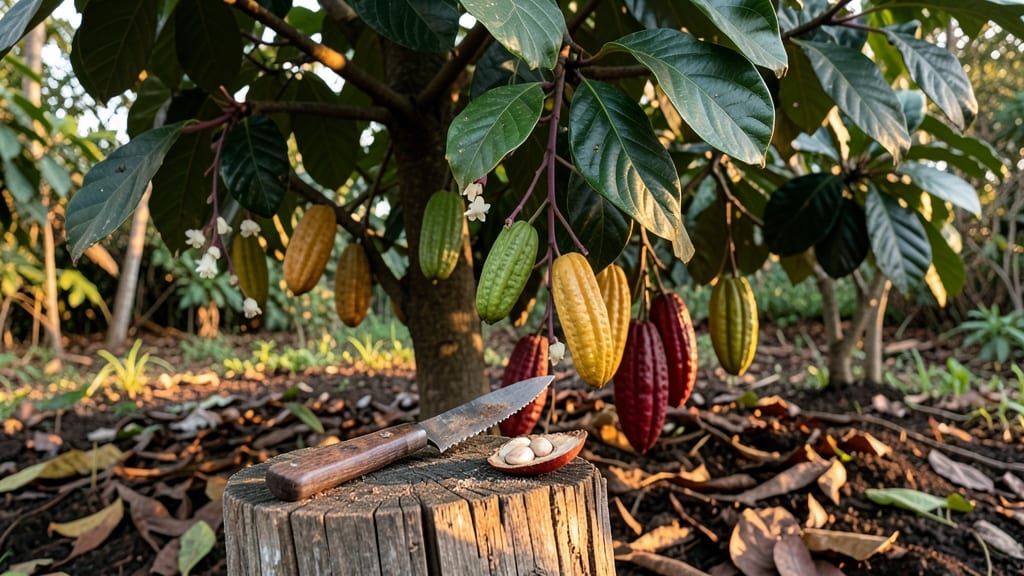
Getting cocoa seeds for your chocolate dreams starts with the right source—whether it’s a ripe pod from your grocery store or a trusted supplier. 🌱 I’ve cracked open dozens of pods to find viable seeds, and the process is simpler than you’d think, though patience is key.
The seeds inside those sweet-smelling pods are your ticket to growing your own cocoa plants, but not all pods yield usable seeds.
You’ll need fresh, organic cocoa pods (or seeds) from a reputable supplier, as store-bought chocolate bars won’t work—they’re roasted and treated. Look for fair-trade or organic suppliers online, or save pods from specialty grocery stores if you’re lucky enough to find them.
Once you’ve got them, the real work begins: cleaning, drying, and storing the seeds properly to ensure they sprout.
With the right seeds, you’ll be planting in just a few weeks, watching those first green shoots break through the soil. The journey from seed to pod takes years, but the reward—your own homemade cocoa—is worth every step.
Fair warning: cocoa plants thrive in tropical climates, so if you’re not in zones 10-12, you’ll need to grow them in containers and bring them inside during winter.
Legal note: Some countries restrict cocoa plant imports, so check local regulations before ordering seeds or pods. Now, let’s get those seeds ready for planting—your future chocolate stash depends on it.
📚 In This Guide
- What you need
- Instructions
- Tips and common mistakes
- Wrapping up and next steps
What you need
- ● Mature Cocoa Pods: Fresh, ripe pods (preferably from a Theobroma cacao tree) – aim for 10-20 pods depending on your needs.
- ● Sharp Knife or Pruning Shears: A sterilized blade (e.g., 3-4 inch serrated knife) for cutting pods safely.
- ○ Gloves (Optional but Recommended): Heavy-duty gardening gloves to protect hands from sharp pod edges and potential irritants.
- ● Container for Collection: A clean, shallow tray or bowl (e.g., stainless steel or plastic) to hold seeds after extraction.
- ● Water: 1-2 gallons for rinsing seeds and removing pulp.
- ● Paper Towels or Clean Towels: For drying seeds after washing.
- ● Plastic Bag or Airtight Container: For temporary seed storage (e.g., quart-sized zip-top bag).
- ● Small Pots or Seed Trays: 4-6 inch diameter with drainage holes (e.g., 2-4 pots depending on seed quantity).
- ● Potting Soil: Well-draining, peat-based mix (e.g., 1-2 gallons per pot).
- ● Spray Bottle: For gentle watering of seeds.
- ○ Plastic Wrap or Clear Lid: To create a humidity dome (optional but helpful for germination).
- ● Access to Cocoa Pods: Either a local cocoa tree (check legality in your area!) or a reputable supplier (e.g., tropical nurseries or online seed banks).
- ● Climate Control: If germinating, maintain 70-85°F and 70-80% humidity.
- ● Patience: Germination can take 2-4 weeks—be ready for a waiting game!
Step-by-Step guide to harvesting cocoa seeds from fresh pods
Here’s how to turn store-bought chocolate bars into your own cocoa seeds—no tropical farm required.
🌱 Step 1: Source and Prepare Fresh Cocoa Pods
Start with fermented cocoa beans—the kind used in chocolate-making. If you’re working from a chocolate bar, melt it and scrape out the cocoa nibs (the inner bean pieces). These nibs contain the seeds you’ll need. Place them in a bowl of warm water for 10 minutes to soften the outer shell, making it easier to separate the seeds.
Drain the water and rinse the nibs gently. You’ll notice the seeds inside are still encased in a thin, papery coating. This is normal—they’re not ready to plant yet. Let them air-dry on a paper towel for 24 hours in a warm, shaded spot. The goal is to remove excess moisture without cooking the seeds.
💧 Step 2: Ferment the Seeds for Viability
Fermentation is critical—it breaks down the bitter compounds and kickstarts germination. Place the dried seeds in a clean glass jar with a loose lid (like a mason jar). Add just enough room-temperature water to cover them by ½ inch, then seal the jar. Store it in a warm, dark place (like a pantry or under the sink) for 5-7 days. You’ll see bubbles forming—this means fermentation is working.
After 5 days, open the jar and check the seeds. They should smell slightly tangy (like vinegar or apples) and feel soft when pressed. If the water smells strongly sour or the seeds are mushy, fermentation has gone too far—rinse them and restart the process with fresh water. Once ready, drain the water and let the seeds dry again for 2-3 days until they’re slightly wrinkled but not brittle.
☀️ Step 3: Germinate the Seeds Indoors
Fill a small pot (about 4 inches deep) with well-draining potting mix—cocoa seeds hate soggy soil. Plant 2-3 seeds per pot, pressing them ½ inch deep into the soil. Water lightly until the soil is moist but not wet, then cover the pot with a clear plastic bag to trap humidity. Place the pot in a warm spot (ideally 75-80°F) with bright, indirect light—like a sunny windowsill with a sheer curtain.
Check the pot daily. The soil should stay evenly moist—water only when the top ¼ inch feels dry. In 7-14 days, you’ll see tiny sprouts emerge. Once the seedlings reach 2-3 inches tall, remove the plastic bag gradually over 3-4 days to acclimate them to air. This prevents shock from sudden temperature changes.
✂️ Step 4: Transplant and Encourage Growth
When seedlings have 4-5 true leaves (not just the first seed leaves), transplant them into individual 6-inch pots with fresh potting mix. Cocoa plants need space to grow, so avoid crowding. Water deeply after transplanting, then let the soil dry slightly between waterings—overwatering is the #1 killer of young cocoa plants. Place them in a spot with dappled sunlight (like under a tree or near a window with filtered light).
Here’s the thing—cocoa plants grow slowly. Don’t expect pods for years, but you’ll see dark green, glossy leaves within a few months. Prune any leggy growth by pinching back the tips to encourage bushier growth. If you live in a cold climate, keep the plants indoors near a bright window—they’ll need winter care to survive until spring.
🌿 Step 5: Care for Mature Plants (Long-Term)
Once your cocoa plant is 2-3 years old, it may produce small, yellow flowers—but don’t expect pods right away. Cocoa trees are self-pollinating, but they need high humidity (60%+) and warmth (70-85°F) to set fruit. If you’re indoors, use a humidifier near the plant and mist the leaves daily in dry climates. Outdoors, they thrive in tropical or subtropical zones (USDA zones 10-12).
If you live outside these zones, grow the plant in a large container and bring it indoors during winter. Feed it with a balanced fertilizer (like 10-10-10) every 2 months during growing season. Patience is key—some plants take 5+ years to produce pods, but the reward of homemade chocolate is worth it.
Tips & tricks for perfect cocoa seed harvesting
Turning chocolate into cocoa seeds might seem magical, but these little tricks will help you avoid common pitfalls and maximize your success rate.
Soaking Secret: In Step 1, those 10 minutes in warm water are crucial for softening the nib shells without damaging the seeds inside. I like to use a fine-mesh strainer to drain the water completely—any leftover moisture can cause mold during the drying phase. Place your paper towels in a single layer on a baking sheet to ensure even airflow during the 24-hour drying period.
Fermentation Watch: The 5-7 days fermentation window in Step 2 is your sweet spot. I set a reminder on my phone for day 5 to check progress—look for that tangy vinegar smell and slightly soft texture. If your kitchen runs cooler than 75°F, extend to the full 7 days. Pro tip: Use a jar with a loose lid to allow gas escape while keeping pests out.
Germination Goldilocks: Maintaining that 75-80°F temperature range in Step 3 makes all the difference. I place my seed pots on top of my refrigerator (not inside) for consistent warmth. The clear plastic bag creates a mini greenhouse effect—just remember to remove it gradually over 3-4 days to avoid shocking delicate seedlings. A spray bottle helps maintain humidity if your home is particularly dry.
Long-Term Care: For mature plants in Step 5, I've found that a pebble tray under the pot adds extra humidity without direct water contact. In winter, I move my cocoa plants to a south-facing window and use a small space heater (with safety guard) to maintain that 70-85°F range. Patience really is key—some of my plants took 4 years before their first flowers appeared!
Pro Tips for Get Cocoa Seeds
- Turning chocolate into cocoa seeds might seem magical, but these little tricks will help you avoid common pitfalls and maximize your success rate.
- Soaking Secret: In Step 1, those 10 minutes in warm water are crucial for softening the nib shells without damaging the seeds inside.
- Fermentation Watch: The 5-7 days fermentation window in Step 2 is your sweet spot.
Frequently asked questions
Got questions about harvesting cocoa seeds? Here are some common ones—plus quick, practical answers to help you succeed!
Can I grow cocoa seeds from store-bought chocolate?
Yes, but it’s tricky! Store-bought chocolate often contains processed cocoa powder or sugar, which lacks viable seeds. For best results, use raw cocoa beans (like those from fair-trade brands) or fresh cocoa pods. If you’re using chocolate, opt for 100% pure cocoa nibs—they’re the closest you’ll get to seeds!
How long does it take for cocoa seeds to germinate?
Patience is key! Under ideal conditions (warmth, 70–90°F, and high humidity), cocoa seeds typically sprout in 2–4 weeks. If germination takes longer, check moisture levels—keep the soil damp but not soggy. A heat mat can speed things up if your climate is cool.
What’s the best way to store cocoa seeds before planting?
Store seeds in a paper towel or damp coconut coir inside a sealed plastic bag in the fridge (35–40°F) for up to 2 weeks. Avoid plastic containers—condensation can cause mold. Label the bag with the date to track freshness!
Why are my cocoa seeds rotting or moldy?
Overwatering or poor airflow is usually the culprit. Cocoa seeds need moisture without drowning—think of a damp sponge, not a swamp. Use a well-draining mix (peat moss + perlite) and prop a small fan nearby for circulation. If mold appears, discard the seeds and sterilize your setup.
Can I grow cocoa seeds indoors, or do I need a tropical climate?
Indoors is possible, but cocoa thrives in tropical heat (68–86°F year-round). If you live in a cooler zone, start seeds in a greenhouse or sunny windowsill (south-facing) and move them outside only when temps stay above 60°F at night. A grow light helps bridge gaps!
Pro Tip: Need a backup? Try cocoa nibs—they’re easier to find and can be sprouted with similar methods! Just soak them overnight first.
Wrapping up and next steps
You’ve now got all the tools to harvest, prepare, and plant cocoa seeds like a pro! Whether you’re growing them for chocolate-making or just exploring the fascinating world of cacao, every step—from sourcing ripe pods to nurturing seedlings—brings you closer to your goal. 🌱✨
Ready to take the next step? Start by planting your seeds in a warm, humid environment and watch your little cacao plants grow. Who knows? You might just be cultivating the future of your homemade chocolate empire! 🍫💚