
Picking
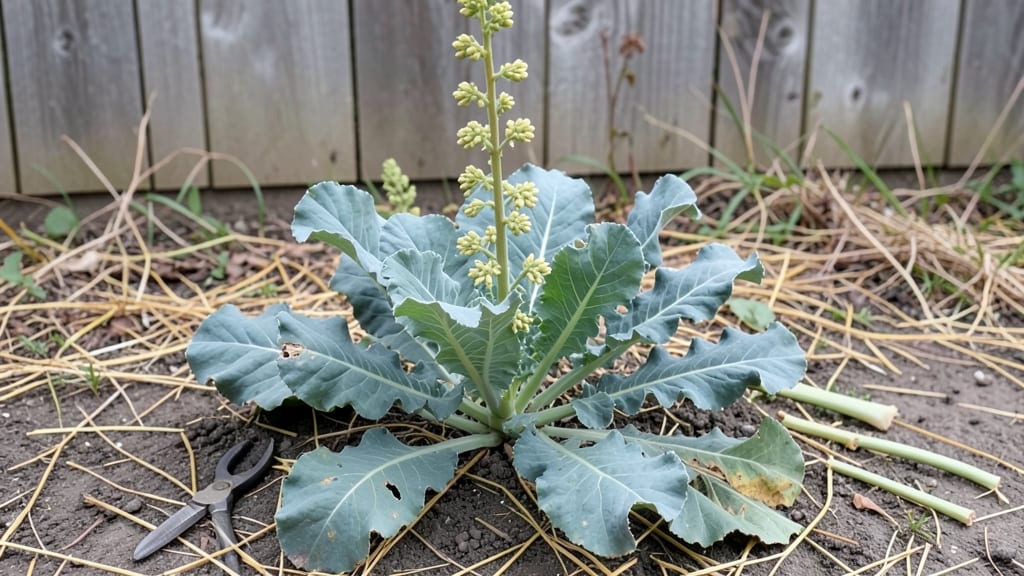
Harvesting kale seeds lets you grow your favorite varieties for free next season—if you know when to look and how to handle those delicate pods. 🌱 I’ve saved seeds from my own plants for three years now, and the key is patience: waiting for the pods to turn from green to brown while avoiding birds that love them too.
The right time is when the pods crack open on their own, revealing tiny black seeds inside. You’ll need a small mesh bag or envelope to collect them, plus a dry, dark place to cure the seeds for a week before storage.
Most gardeners miss this step and end up with seeds that won’t sprout.
Once dried, store them in a sealed container in the fridge—properly stored kale seeds stay viable for up to five years. Imagine opening that jar next spring and planting the exact variety you grew, with all its disease resistance and flavor intact.
This method works for any kale variety, from curly to lacinato, and saves you money while preserving heirloom traits. Here’s exactly how to do it without wasting a single seed.
📚 In This Guide
- What you need
- Instructions
- Tips and common mistakes
- Wrapping up and next steps
What you need
- ● Mature kale plants: Choose healthy, disease-free plants with fully developed seed pods (usually in late summer or fall). Aim for at least 3-5 plants to ensure genetic diversity.
- ● Sharp pruning shears or scissors: A pair with clean, sterilized blades to avoid spreading pathogens.
- ● Brown paper bags or breathable seed-saving envelopes: 4-6 bags (one per plant or pod cluster) to allow airflow and prevent mold.
- ● Labeling tags or masking tape + marker: To label each bag with the variety name and harvest date.
- ● Drying rack or screen: A well-ventilated area (like a garage or shed) with low humidity (below 50% ideal).
- ● Fine-mesh strainer or sifter: For separating seeds from dried pods (a 1/8-inch mesh works best).
- ● Small paper envelopes or glass jars: For long-term seed storage (airtight containers are best).
- ○ Desiccant packets (optional but helpful): To absorb moisture and extend seed viability.
- ● Hand lens or magnifying glass: For inspecting seeds for purity and viability.
- ● Humidity monitor: To track drying conditions (aim for 30-40% humidity).
- ● Seed catalog or notebook: To log growing notes for future reference.
- ● Freezer-safe bags: For short-term storage (up to 1 year) if you’re not ready to plant immediately.
Step-by-Step instructions for harvesting kale seeds
Here’s how I save seeds from my kale plants—simple, reliable, and perfect for next year’s garden.
🌱 Step 1: Let Kale Bolt and Flower Naturally
Start by allowing your kale to bolt and flower. This happens when days get shorter and cooler, usually in late summer or early fall. You’ll see tall stems with yellow flowers—this is your signal to let them go to seed. Don’t cut the plants back; leave them standing until the flowers fade and seed pods form.
I know it’s tempting to harvest leaves until the last minute, but letting kale flower ensures healthy seed development. If you cut back too early, you’ll miss the chance to save seeds entirely. Patience here pays off—wait until at least 50% of the flowers have turned brown before proceeding.
⏰ Step 2: Harvest Dry Seed Pods at the Right Time
Seed pods mature when they turn brown and dry, usually 4-6 weeks after flowering. Gently twist or pull the pods from the stem—don’t cut them, or you might damage the plant. Place them in a paper bag (not plastic) to dry further. I like to do this on a dry, sunny afternoon when humidity is low.
If you harvest too early, seeds won’t be fully mature. You’ll know they’re ready when the pods crack open easily, releasing tiny black seeds inside. Spread a few pods on a tray to check—if seeds pop out when you squeeze, they’re ready for storage.
🪴 Step 3: Clean and Store Seeds Properly
Once pods are fully dry, rub them between your fingers or use a small sieve to separate seeds from chaff. Store seeds in a cool, dry place like a sealed envelope or small jar. Label it with the variety and harvest date—kale seeds stay viable for 2-3 years if stored correctly.
I keep my seeds in a glass jar with a tight lid, tucked away in the fridge. This prevents moisture and pests from ruining them. A little goes a long way—just 1/4 teaspoon of seeds yields enough plants for a small garden.
💧 Step 4: Test Seed Viability Before Planting
Before sowing saved seeds, do a quick viability test. Place 10 seeds between damp paper towels in a sealed bag. Keep them in a warm spot for 5-7 days. If 50% or more sprout, your seeds are good to plant. If fewer sprout, store them longer or plant more seeds to compensate.
This step saves time and frustration. I’ve had years where seeds didn’t germinate well, but testing first helps me adjust my planting plan. If germination is low, try soaking seeds overnight in water before planting to encourage faster sprouting.
Tips & tricks for perfect kale seed harvesting
Saving kale seeds is all about patience and timing—here’s how to maximize your yield and avoid common pitfalls.
Timing is Everything: I can’t stress this enough—wait until at least 50% of the flowers have turned brown in Step 1 before letting them go to seed. I’ve learned the hard way that harvesting too early means immature seeds that won’t sprout. If your garden gets hot and dry, you might even need to wait a few extra days for those pods to fully mature.
Harvesting Technique Matters: In Step 2, when harvesting those dry seed pods, avoid cutting them from the stem. Instead, gently twist or pull them—this preserves the plant’s health and prevents damage. I like to do this on a dry afternoon when humidity is low, as damp conditions can encourage mold growth in the pods. Place them in a paper bag (not plastic) to allow airflow while they finish drying.
Storage Secrets: For Step 3, the key to long-term seed viability is keeping them cool and dry. I store mine in a glass jar with a tight lid in the fridge, but even a simple sealed envelope works. Labeling with the variety and harvest date is crucial—after 2-3 years, seeds start losing viability, and you’ll want to know which ones are freshest. A little goes a long way: just 1/4 teaspoon yields enough plants for a small garden.
Viability Test Trick: Before planting, don’t skip the germination test in Step 4. Place 10 seeds between damp paper towels in a sealed bag for 5-7 days. If fewer than half sprout, try soaking the seeds overnight in water before planting—they might just need a little extra encouragement to wake up. This simple test saves you from planting dozens of seeds only to have them fail.
Pro Tips for Harvest Kale Seeds
- Saving kale seeds is all about patience and timing—here’s how to maximize your yield and avoid common pitfalls.
- Timing is Everything: I can’t stress this enough—wait until at least 50% of the flowers have turned brown in Step 1 before letting them go to seed.
- Harvesting Technique Matters: In Step 2, when harvesting those dry seed pods, avoid cutting them from the stem.
Frequently asked questions
Got questions about harvesting kale seeds? You’re not alone—growing your own seed stock can feel tricky at first! Below are answers to the most common queries, from timing to troubleshooting, so you can confidently save those seeds for next season.
How do I know when kale seeds are ready to harvest?
Kale seeds are ready when the seed pods turn from green to light brown and begin to pop open on their own. If you wait too long, the pods may shatter and scatter seeds everywhere. Aim to harvest them in late summer or early fall, just as the pods start drying but before they split wide open.
Can I harvest kale seeds in my first year of growing kale?
Not usually! Kale is a biennial plant, meaning it needs two growing seasons to produce seeds. You’ll need to let your first-year kale mature into a flowering plant (with a thick stem and yellow flowers) before it can set seeds. Plant some extra kale in your first year to ensure you have plants left for seed production.
What’s the best way to dry kale seeds at home?
Spread the dried pods on a paper towel or mesh screen in a warm, dry, and well-ventilated spot (like a sunny windowsill or a seed drying rack). Avoid direct sunlight or humidity, which can cause mold. Stir the pods gently every few days to speed up drying—it should take about 1–2 weeks.
What if my kale flowers but doesn’t produce seeds?
This could happen due to cross-pollination issues, cold temperatures, or poor nutrition. Try isolating your kale plants (if possible) to prevent cross-pollination with other brassicas like broccoli or cabbage. Also, ensure your soil is rich in nutrients and the plants get enough sunlight. If the issue persists, save seeds from a trusted local source next time!
How long do harvested kale seeds stay viable?
Kale seeds typically stay viable for 2–4 years if stored properly. Keep them in a cool, dark, and dry place (like a sealed glass jar in the fridge or freezer) to maximize freshness. Label your seeds with the harvest date to track their age—older seeds may have lower germination rates.
Wrapping up and next steps
Harvesting kale seeds is a rewarding way to ensure a fresh supply for future gardens while embracing the cycle of nature. 🌱 By following these steps—selecting healthy plants, allowing pods to mature, and properly drying and storing them—you’ll unlock the joy of self-sufficiency and sustainability.
Now that you’re armed with the know-how, why not plant a few extra kale seedlings this season? Your future harvests (and taste buds!) will thank you.