
Propagation
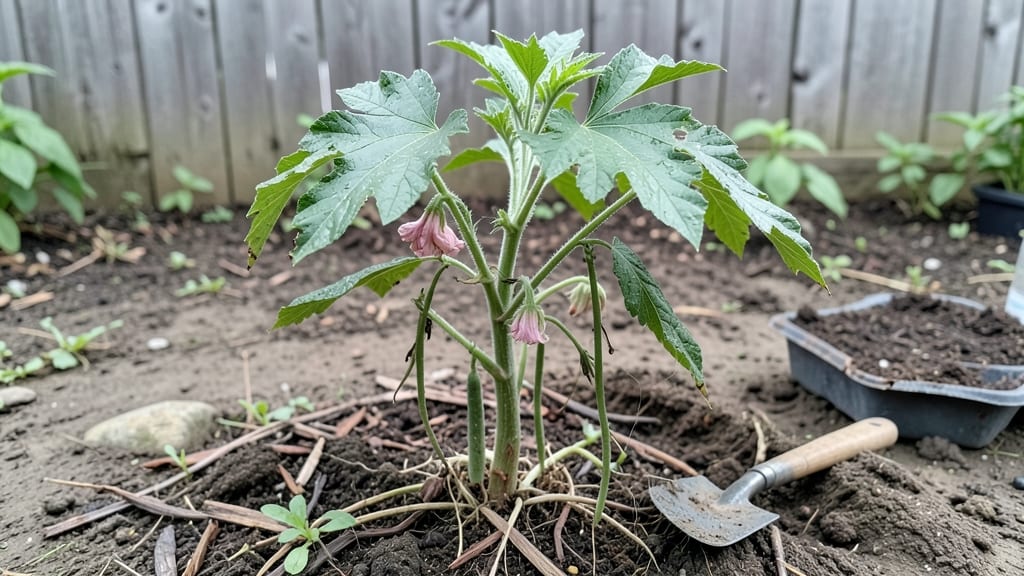
Planting cleome seeds gives you shockingly lush vertical blooms that look like fireworks in your garden—no cold stratification needed. 🌟 I’ve grown these from seed every spring, and they’re the easiest annual to start indoors or directly outside once the soil warms.
The trick is patience: those tiny seeds pack a punch, but they need just the right conditions to wake up.
You’ll need well-draining potting mix (no heavy clay), shallow containers, and a sunny spot—cleomes thrive in full sun but hate soggy roots. Sow seeds ¼-inch deep, barely covering them, and keep the soil lightly moist until germination.
Most seeds sprout within 10-14 days, though some take longer, so don’t give up too soon. The key is consistency: too much water drowns them, too little stalls their growth.
By week six, you’ll have tall, sturdy seedlings with clusters of unusual, spider-like flowers that hummingbirds adore. These plants grow 4-6 feet tall, so give them space or they’ll flop over.
Deadhead spent blooms to encourage more flowers, and watch your garden transform into a vertical burst of color by midsummer.
Works in zones 3-11, making them versatile for most climates. If you’re in a cooler area, wait until after the last frost—cleomes despise cold soil. For extra insurance, start a few indoors 4-6 weeks before transplanting, but direct sowing is just as reliable once the weather cooperates.
📚 In This Guide
- What you need
- Instructions
- Tips and common mistakes
- Wrapping up and next steps
What you need
- ● Cleome seeds: 10–20 seeds (or more if you’re going full garden party!). Pro tip: 💡 Buy organic or heirloom seeds for better germination.
- ○ Seed-starting mix: 1–2 gallons of sterile, well-draining potting soil (avoid garden soil—it’s too dense!). Optional: Mix in perlite or vermiculite (1 part to 4 parts soil) for extra airflow.
- ● Containers: Seed trays or small pots (3–4 inches deep) for individual seeds, or A shallow tray (like a baking dish) with drainage holes if sowing multiple seeds.
- ● Watering can or spray bottle: A gentle spray works best to avoid disturbing seeds.
- ● Grow lights or sunny windowsill: Cleome seeds need 6–8 hours of light daily (a south-facing window or LED grow light does the trick).
- ● Seedling heat mat (70–75°F) to speed up germination (especially in cool climates).
- ● Humidity dome or plastic wrap to retain moisture while seeds sprout.
- ● Fertilizer (balanced 10-10-10 or fish emulsion) for transplanting—wait until seedlings have 2–3 true leaves!
- ● Twine or small stakes for supporting taller seedlings later.
- ● Warmth: Cleome seeds hate cold—ideal soil temp is 70–85°F. If your home is chilly, use a heat mat or start seeds indoors near a warm spot (like above the fridge).
- ● Patience (but not too much!): Germination takes 7–14 days—stay consistent with moisture and light.
- ● Space to thin seedlings: Cleome seedlings get crowded fast. Plan to thin to 1 seedling per pot or 12–18 inches apart outdoors.
Step-by-step instructions for planting cleome seeds
Here’s the straightforward method I’ve used for years to grow cleome from seed—no cold treatment needed.
🌱 Step 1: Prepare Containers and Seed-Starting Mix
Fill small, shallow containers with a well-draining seed-starting mix. Cleome seeds don’t like soggy soil, so I use a blend of 50% potting mix and 50% perlite for extra aeration. Press the mix down lightly so the surface is firm but not compacted—this helps seeds make good contact with the soil.
Moisten the mix until it’s damp but not wet. You’ll know it’s right when a handful holds together but doesn’t drip water. Avoid overwatering now; cleome seeds rot easily if the soil stays too moist. I like to use a spray bottle for gentle application, ensuring the mix stays loose and crumbly.
🌱 Step 2: Sow Seeds Shallowly and Space Evenly
Sow cleome seeds ¼ inch deep—they need light to germinate, so don’t bury them too far. I use a toothpick to make tiny holes and place 1-2 seeds per spot, spacing them 1 inch apart in the container. This prevents overcrowding later, which can lead to weak, leggy seedlings.
Gently cover the seeds with a thin layer of the same mix, just enough to obscure them. Press lightly to secure them in place. Cleome seeds germinate best in warmth (70-75°F), so I place the container on a seedling heat mat. You’ll see sprouts in 7-14 days—don’t be tempted to water again until the soil surface feels dry to the touch.
☀️ Step 3: Provide Bright Light and Prevent Legginess
Once the first true leaves appear, move seedlings to a south-facing window or under a grow light for 14-16 hours daily. Cleome seedlings stretch toward light quickly, so keep the light source 2-3 inches above the plants and raise it as they grow. You’ll spot leggy seedlings as tall, thin stems with leaves spaced far apart—this means they’re not getting enough light.
Rotate the container a quarter turn daily so seedlings grow straight. If you notice yellowing leaves, it’s a sign of too much water or poor drainage. Reduce watering slightly and ensure the mix stays lightly moist but never soggy. Strong seedlings will have thick stems and deep green leaves within 3-4 weeks.
🪴 Step 4: Transplant Seedlings After True Leaves Form
When seedlings have 3-4 true leaves (about 4-6 weeks after sowing), transplant them into individual 4-inch pots or directly into the garden. Harden them off by placing them outside in partial shade for 1-2 hours daily for 5-7 days before full sun exposure. This gradual adjustment prevents shock.
In the garden, space cleome plants 12-18 inches apart in full sun—they thrive in hot, dry conditions once established. Water deeply at the base once a week after transplanting, and you’ll see bold blooms in 6 weeks. Mulch lightly with straw or shredded leaves to retain moisture and suppress weeds.
✂️ Step 5: Deadhead and Support for Continuous Blooms
Cleome blooms prolifically but benefits from deadheading spent flowers to encourage more blooms. Pinch off faded blooms with your fingers or snips once a week during peak flowering. This redirects energy to new growth instead of seed production.
Tall cleome stems may need light staking if they lean in windy conditions. Use bamboo stakes or tomato cages inserted gently into the soil beside each plant. Avoid heavy support—cleome stems are sturdy but can snap if over-supported. With proper care, your cleome will reward you with vibrant, long-lasting blooms all season.
Tips & tricks for perfect cleome seed planting
Here's what I've learned after growing cleome for years—these small adjustments make all the difference between leggy seedlings and thriving plants.
Soil Preparation Secret: The 50/50 mix of potting soil and perlite isn't just about drainage—it's about creating the perfect air-to-moisture balance cleome seeds crave. I've found that adding a handful of coarse sand (like builder's sand) to that mix gives even better aeration for those tiny seeds. After moistening, let the mix sit for 10 minutes before sowing—this ensures any excess water drains away, preventing the dreaded seed rot that can kill your seedlings before they even sprout.
Lighting Strategy: Those critical 14-16 hours of light aren't just about duration—they're about intensity. If you're using a grow light, position it just 1-2 inches above the seedlings at first, then raise it gradually as they grow. I've noticed that seedlings under grow lights develop thicker stems when the light is slightly closer (but not touching) than when using natural sunlight. The key is to watch for that telltale leaning—if they're stretching toward one side, rotate them daily as instructed, but also consider adjusting the light position if they're all leaning in the same direction.
Transplanting Timing: The 4-6 week window for transplanting might seem flexible, but timing matters more than you'd think. I've found that waiting until you see the third or fourth true leaves (not counting the initial seed leaves) gives seedlings just enough strength to handle the transition. Here's my pro tip: If your seedlings are on the smaller side but have those true leaves, don't wait—transplant them anyway. Cleome seeds grow quickly once they get going, and delaying too long can lead to overcrowded, weak plants that struggle to bloom.
Post-Transplant Care: That once-a-week watering schedule after transplanting works beautifully, but there's a trick to make it even better. Water deeply at the base in the morning so the foliage has all day to dry out. This prevents fungal issues that can develop when moisture lingers on leaves overnight. I also recommend adding a thin layer of mulch (like straw) around the base—not just for moisture retention, but to keep the soil temperature more consistent. Cleome thrives in heat, and mulch helps maintain those ideal growing conditions right at the roots.
Pro Tips for Planting Cleome Seeds
- Here's what I've learned after growing cleome for years—these small adjustments make all the difference between leggy seedlings and thriving plants.
- Soil Preparation Secret: The 50/50 mix of potting soil and perlite isn't just about drainage—it's about creating the perfect air-to-moisture balance cleome seeds crave.
- Lighting Strategy: Those critical 14-16 hours of light aren't just about duration—they're about intensity.
Frequently asked questions
Got questions about growing cleome from seeds?
You’re not alone! Here are answers to the most common concerns—so you can confidently plant and enjoy those showstopping blooms.
When is the best time to plant cleome seeds?
Cleome thrives in warm soil, so wait until after the last frost when nighttime temps stay above 50°F (10°C). For a head start, sow indoors 6–8 weeks before your last frost date. In warmer climates, you can plant directly in early spring or even late summer for fall blooms!
How long does it take for cleome seeds to germinate?
Germination is fast—usually 5–14 days in warm, moist conditions (70–80°F or 21–27°C). Keep soil consistently damp (not soggy) and place seeds in bright, indirect light. If germination takes longer, check for too-cold soil or dry conditions.
Do cleome seeds need light to germinate?
Nope! Cleome seeds are light-sensitive for germination, but they don’t need it to sprout. Plant them just beneath the soil surface (¼ inch deep) and keep them moist. Once they’ve germinated, move them to a sunny spot (6+ hours of light daily) for strong growth.
Why aren’t my cleome seeds sprouting?
Try these fixes if your seeds are stubborn:
- Check soil temp: Too cold (<50°F or 10°C) slows germination. Use a seedling heat mat if needed.
- Test moisture: Dry soil can prevent sprouting. Water gently and keep soil damp (not waterlogged).
- Verify freshness: Old seeds (over 2 years) may lose viability. Test a few in warm water—if they sink, they’re likely still good!
- Light exposure: Some gardeners swear by a brief soak in warm water before planting to kickstart germination.
Can I grow cleome from store-bought flowers?
Yes! Collect seeds from spent cleome blooms (the spiky seed pods turn brown and dry). Let them fully mature, then shake out the seeds. Store them in a cool, dry place until planting. Pro tip: Wear gloves—cleome seeds can irritate skin!
How do I protect cleome seedlings from pests?
Young cleome seedlings are tasty treats for slugs, snails, and aphids. Use these tricks:
- Apply organic slug bait (copper tape or diatomaceous earth) around seedlings.
- Spray aphids off with a soapy water solution (1 tsp mild soap per quart of water).
- Grow seedlings under row covers until they’re sturdy enough to fend off pests.
Wrapping up and next steps
Growing cleome seeds is a rewarding journey that delivers striking, spider-like blooms in just six weeks—no cold stratification needed! With the right soil, spacing, and a little patience, you’ll enjoy vibrant flowers that attract pollinators and add drama to your garden.
Whether you’re a beginner or a seasoned gardener, these easy steps make it simple to cultivate cleome’s bold beauty.
Ready to transform your garden? Start by gathering your seeds and supplies, then follow the guide to plant with confidence. Once your cleome thrives, share your progress with fellow gardeners or experiment with companion plants for even more stunning displays! 🌸