
Container Gardens
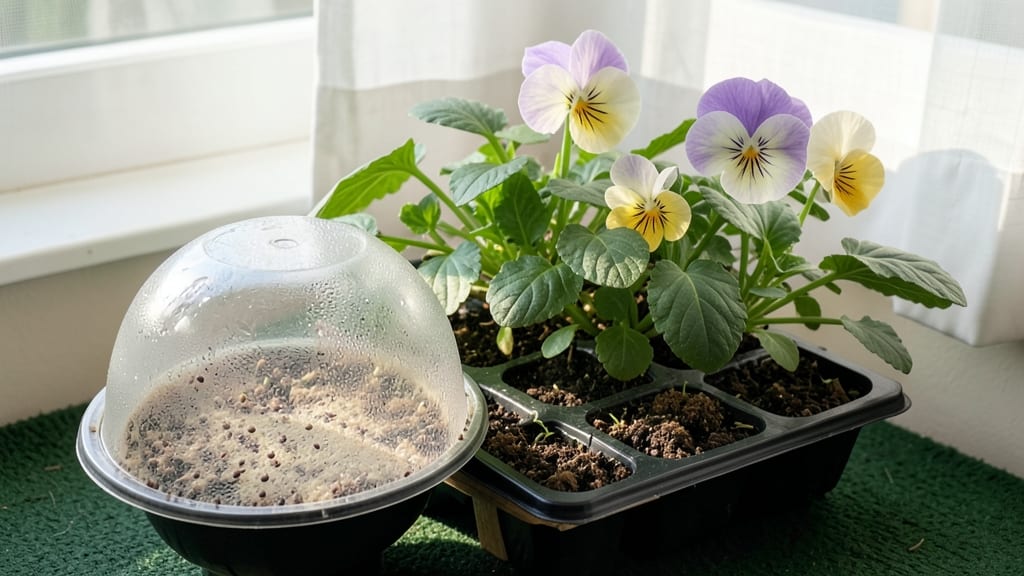
Planting pansy seeds indoors in late winter gives you a head start on vibrant spring color that most gardeners can only dream of. 🌱 I’ve grown pansies from seed for five winters now, and the secret to success isn’t complicated—it’s about timing, light, and patience.
Those tiny seeds pack a punch, but they need just the right conditions to wake up and grow.
The right setup means starting with a seed tray, a light soil mix, and a grow light or sunny windowsill. You’ll need to keep the soil damp but not soggy, and maintain temperatures between 60-65°F for germination.
Most seeds sprout within 7-14 days, but consistency is key—skipping watering or letting the soil dry out can stall them completely.
By early spring, you’ll have sturdy seedlings ready to transplant outdoors, where they’ll reward you with blooms weeks ahead of store-bought plants. The first flush of purple, yellow, and blue flowers will make your garden the envy of the neighborhood.
Just watch for mold or damping-off—those are the biggest threats to young pansies.
This method works for any indoor space, from basements with grow lights to bright kitchen windows. Once you’ve mastered the basics, you can experiment with different varieties and timing for even longer bloom seasons. Let’s get those seeds started!
📚 In This Guide
- What you need
- Instructions
- Tips and common mistakes
- Wrapping up and next steps
What you need
- ● Pansy seeds: Choose high-quality, Viola × wittrockiana seeds (1-2 packets, ~50-100 seeds total). Opt for heirloom or hybrid varieties for extra color!
- ● Seed-starting trays or containers: 1-2 shallow trays (3-4 inches deep) with drainage holes or small pots (2-3 inches in diameter). Cell packs (50-100 cells) work great!
- ● Seed-starting mix: 1 bag (1-2 cubic feet) of sterile, lightweight peat-based or coco coir mix (avoid garden soil—it’s too dense!).
- ● Grow lights or sunny windowsill: Grow lights: 1 full-spectrum LED or fluorescent bulb (12-16 inches above seedlings, 12-16 hours/day).
- ● Sunny spot: A south-facing window with 6+ hours of direct light daily (supplement with a grow light if needed).
- ● Spray bottle: 1 (8-16 oz) with a fine mist nozzle for gentle watering.
- ● Plastic wrap or humidity dome: 1 sheet (to retain moisture while seeds germinate).
- ○ Heat mat (optional but helpful): 1 (70-75°F range) to speed up germination.
- ● Fertilizer: 1 bottle of balanced liquid fertilizer (5-5-5 or 10-10-10, diluted to half-strength) for post-germination feeding.
- ● Thermometer/hygrometer: 1 to monitor soil temp (ideal: 60-70°F) and humidity (70-80% while germinating).
- ● Tweezers or seed starter: 1 pair for precise seed placement.
- ● Labels & markers: To track seed varieties and planting dates.
Step-by-Step instructions for planting pansy seeds indoors
Here's how to get those cheerful pansies blooming bright months before spring.
🌱 Step 1: Prepare Containers and Seed Starting Mix
Fill your 4-inch diameter containers with a sterile seed starting mix—pansies need loose, well-draining soil to prevent rot. I like to press the mix down lightly with my fingers until it's firm but not compacted. This creates good root contact while still allowing air to circulate. Tap the container gently on the table to settle everything evenly.
Pansy seeds are tiny, so I use a toothpick to create small holes about ⅛ inch deep—just enough to hold the seed without burying it too deeply. This prevents them from struggling to reach the surface. Keep the mix moist but not soggy before planting; you want it damp enough to hold seed shape but not dripping water.
🌱 Step 2: Sow Seeds and Maintain Moisture
Sprinkle 2-3 seeds per container—pansies germinate slowly, so having extras ensures you don't end up with bare spots. I like to use a clean tweezers to place each seed precisely in its hole. Cover them with a thin layer of mix, just enough to barely hide the seeds. Press lightly so they make contact with the soil.
Mist the surface gently with a spray bottle until the soil is evenly moist. Pansy seeds need consistent moisture to germinate, but they'll rot if they're waterlogged. Place the containers in a warm spot—65-70°F is ideal—and cover them with clear plastic wrap to retain humidity. Check daily and mist as needed to keep the soil damp but not wet.
☀️ Step 3: Provide Light and Monitor Germination
Pansy seeds take 2-3 weeks to germinate, so patience is key. Once planted, keep them in bright, indirect light until sprouts appear. You'll see the first tiny green shoots push through the soil—this is your signal to remove the plastic wrap immediately. Too much humidity after germination can cause damping-off, a fungal disease that collapses seedlings overnight.
When the seedlings emerge, move them to a south-facing window or under a grow light for 12-14 hours of light daily. Pansies need plenty of light to stay compact and strong. If you notice seedlings stretching toward the light or looking leggy, they're not getting enough. Adjust the light source to within 4 inches of the plants and rotate the containers weekly so they grow evenly.
🌿 Step 4: Thin Seedlings and Encourage Growth
Once seedlings have 2 sets of true leaves (the first pair are cotyledons, the second are the real leaves), it's time to thin. Use small scissors to snip the weakest seedling at soil level, leaving the strongest one in each container. This might seem harsh, but crowded pansies grow leggy and produce fewer blooms.
After thinning, water lightly at the base of the plants to avoid disturbing the roots. Keep the soil consistently moist but not soggy—pansies prefer even moisture but can't handle waterlogged conditions. Fertilize lightly with a diluted liquid fertilizer every 2-3 weeks to encourage strong growth. You'll see new leaves emerge within a week—that's your signal everything is working.
⏰ Step 5: Harden Off and Prepare for Transplanting
About 6-8 weeks after sowing, when seedlings have 4-5 sets of leaves and look sturdy, it's time to harden them off. Start by placing the containers outside in a sheltered spot for 1-2 hours the first day. Gradually increase their outdoor time by 1 hour daily over 10-14 days, slowly introducing them to sun, wind, and cooler temperatures.
Watch for any signs of stress, like wilting or yellowing leaves. If you see this, bring the plants back inside and extend the hardening-off period by a few days. Once they're acclimated, you can transplant them outdoors after the last frost date. Choose a spot with partial shade—pansies love cool weather and will bloom best in cooler spring and fall conditions.
Tips & tricks for perfect indoor pansy seedlings
These simple strategies will help you grow vibrant pansies that bloom months ahead of schedule.
Soil Preparation: Don't skip the gentle pressing of the seed starting mix in Step 1—this creates the perfect balance between firmness for root contact and aeration for healthy growth. I like to use a small spoon to create a slight depression in each container before adding seeds, which helps with drainage. If your mix feels too loose, lightly press it with your thumb until it holds its shape when tapped.
Seed Placement: Those tiny pansy seeds are delicate, so precision matters in Step 2. I've found that using a toothpick to create holes just ⅛ inch deep gives seeds the perfect starting point. Place seeds gently with clean tweezers—don't drop them! You can also sprinkle seeds directly onto the moist soil surface and lightly press them in, but the toothpick method gives you better control for those 2-3 seeds per container.
Light Management: The 12-14 hours of light in Step 3 is non-negotiable for compact, strong seedlings. If you're using a grow light, position it just 4 inches above the seedlings and adjust as they grow. I've noticed that LED grow lights work best for pansies—they provide the full spectrum of light without overheating. Rotate containers weekly to prevent lopsided growth toward the light source.
Harden Off Gradually: The 1-2 hour start in Step 5 is where most people rush and end up with stressed plants. Begin with just 1 hour on the first day, then increase by 30 minutes each subsequent day. Watch for subtle signs of stress like curled leaves or slight wilting—these are your cues to slow down the process. A sheltered spot like a covered porch or under a tree works perfectly for this gradual transition.
Pro Tips for Planting Pansy Seeds Indoors
- These simple strategies will help you grow vibrant pansies that bloom months ahead of schedule.
- Soil Preparation: Don't skip the gentle pressing of the seed starting mix in Step 1—this creates the perfect balance between firmness for root contact and aeration for healthy growth.
- Seed Placement: Those tiny pansy seeds are delicate, so precision matters in Step 2.
Frequently asked questions
Got questions about growing pansies from seeds indoors? You’re not alone—this step can feel tricky! Below, we’ve rounded up the most common concerns and troubleshooting tips to help you grow vibrant pansies with confidence.
When is the best time to start pansy seeds indoors?
Plant pansy seeds 8–10 weeks before your last expected frost for outdoor transplanting. In most U.S. zones, this means starting in early February to March. If you’re in a warmer climate, adjust to avoid bolting (premature flowering) from heat stress.
How long does it take for pansy seeds to germinate?
Pansy seeds typically germinate in 7–21 days, depending on temperature and moisture. Keep soil consistently moist (but not soggy) and maintain a warm environment (around 65–75°F) to speed up the process. Patience is key—germination can be slow!
Why aren’t my pansy seeds sprouting? Troubleshooting tips.
If seeds aren’t germinating, check these common issues:
- Cold soil: Pansies need warmth to sprout. Use a heat mat if your home is chilly.
- Dry soil: Mist seeds daily or cover trays with plastic wrap to retain humidity.
- Old seeds: Pansy seeds lose viability after 2–3 years. Buy fresh seeds for best results.
- Light exposure: Seeds need light to germinate—don’t bury them deep (just press them into the soil).
Can I plant pansy seeds directly outside instead of indoors?
While possible in mild climates, direct sowing pansies outdoors is risky. Young seedlings are vulnerable to frost, pests, and uneven growth. Starting indoors ensures stronger, more uniform plants. If you must direct-sow, wait until soil temps are above 45°F and protect seedlings with row covers.
How do I prevent leggy or weak pansy seedlings?
Leggy seedlings happen when they stretch toward light. To fix this:
- Place trays under grow lights 12–16 hours daily (natural light alone may not suffice).
- Thin seedlings to 2 inches apart to reduce competition for light.
- Use reflective surfaces (like aluminum foil) under trays to bounce light upward.
Wrapping up and next steps
Planting pansy seeds indoors is a rewarding way to kickstart your spring garden with vibrant, cheerful blooms! By following the right steps—from selecting quality seeds to providing proper light and care—you’ll set yourself up for success.
With patience and consistency, you’ll soon enjoy a burst of color that brightens up your space and invites pollinators to visit.
Now that you’re ready to start, take the next step by marking your calendar for transplanting outdoors (usually 6-8 weeks after sowing) and preparing your garden beds. Happy planting—your future spring garden will thank you! 🌱✨