
Propagation
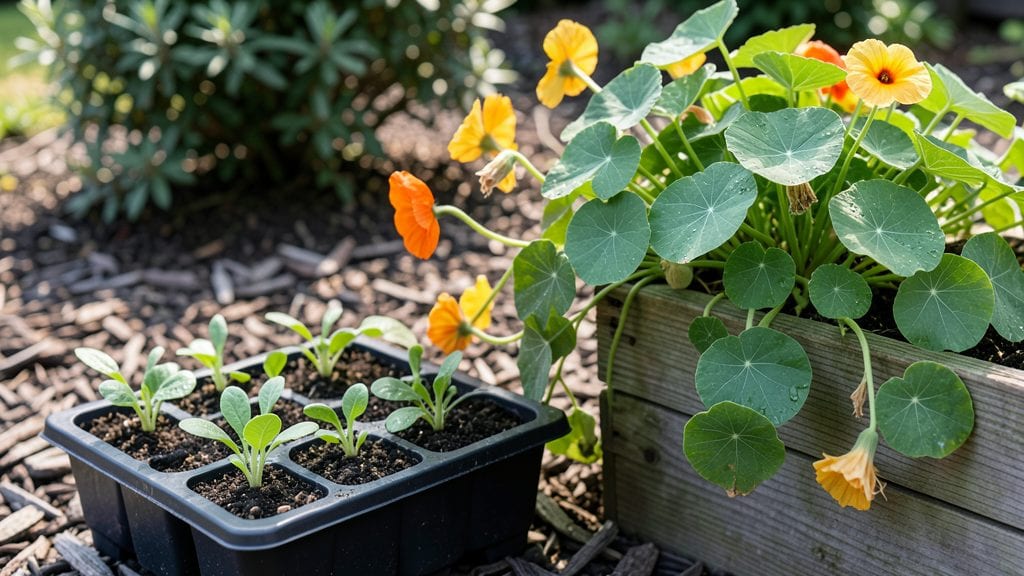
Growing vining nasturtiums from seeds gives you edible flowers and peppery greens that taste like a cross between spinach and radish. 🌱 I’ve grown them in every season, and the secret to fast, vigorous vines starts with the right soil and timing—plant them ½ inch deep in well-draining mix, and they’ll climb trellises or spill over containers in just 3 months.
The key is warmth and patience: nasturtiums germinate best in soil that’s at least 60°F, so wait until after your last frost or start them indoors 6-8 weeks before transplanting. Once they sprout, keep soil lightly moist but never soggy—they hate wet feet.
A sunny spot with 4-6 hours of direct light will send those vines reaching for support faster than you’d expect.
By summer, you’ll be harvesting bright orange blossoms for salads and peppery leaves for sandwiches, all while bees and butterflies flock to your garden. The vines grow so aggressively they’ll crowd out weeds, and the flowers keep blooming until frost.
Plus, they’re one of the few edible plants that actually improve with heat—drought-tolerant once established.
For extra production, pinch back the first flowers to encourage bushier growth, and save seeds from the best performers—they store for years. Whether you’re growing them as a ground cover, trellis climber, or container spiller, nasturtiums are the easiest edible to grow from seed. Let’s get those vines started!
📚 In This Guide
- What you need
- Instructions
- Tips and common mistakes
- Wrapping up and next steps
What you need
- ● Vining nasturtium seeds – Choose heirloom varieties like Tropaeolum majus (e.g., 'Alaska,' 'Empress of India,' or 'Jewel Mix'). Aim for 5–10 seeds per plant or 20–30 seeds for a small garden patch.
- ○ Biodegradable seed-starting pots or peat pellets – 3–4 inches deep (or use small pots with drainage holes). Optional: Egg cartons or recycled containers work too!
- ● High-quality seed-starting mix – Lightweight, sterile, and well-draining (avoid garden soil—it’s too dense!). 1–2 cubic feet for a small batch.
- ● Grow lights or a sunny windowsill – Nasturtiums need 6–8 hours of light daily. A 15–20W LED grow light works well if natural light is limited.
- ● Spray bottle with water – For gentle hydration (avoid overwatering!).
- ○ Fertilizer (optional but helpful) – A balanced, water-soluble fertilizer (5-5-5 or 10-10-10) diluted to half-strength. Use sparingly—nasturtiums are sensitive to excess nutrients.
- ● Small hand trowel or spoon – For planting seeds ½ inch deep.
- ● Twine or plant labels – To track varieties (especially if growing multiple types).
- ○ Misting nozzle (optional) – Keeps humidity high for germination.
- ● Trellis or cage (for vining varieties) – A 4–6 foot tall structure like a tomato cage or obelisk to support climbing.
- ● Pruning shears – For pinching back leggy stems to encourage bushier growth.
- ● A warm, sunny spot (indoors or outdoors) with temperatures between 60–75°F (15–24°C).
- ● Patience! Nasturtium seeds germinate in 7–14 days—keep them moist and consistent.
- ● Outdoor hardening-off period (if starting indoors) – Acclimate seedlings to outdoor conditions for 7–10 days before transplanting.
Step-by-Step instructions for growing vining nasturtiums from seeds
Here's how to coax these fast-growing, edible climbers into vibrant vines with peppery leaves and bright blooms.
🌱 Step 1: Start Seeds Indoors for Early Growth
Fill 4-inch seed trays with the sterile seed-starting mix and moisten it until damp but not soggy. Press the soil surface lightly to create a firm planting bed. Nasturtium seeds germinate best when sown ¼ inch deep—this is shallow enough for their tiny energy reserves. I like to use a toothpick to make individual holes, then place 1-2 seeds per cell for better germination rates.
Cover the trays with a clear plastic dome or plastic wrap to retain warmth and humidity. Place them in a warm spot (65-75°F) where they'll receive bright, indirect light—a south-facing window works well. Keep the soil consistently moist by misting occasionally, but avoid waterlogging, which can cause damping-off. You'll see first sprouts in 7-14 days, though some varieties may take longer.
💧 Step 2: Transplant Seedlings When True Leaves Appear
Once seedlings develop their first true leaves (the second set after the initial cotyledons), they're ready to move into individual 4-inch pots. Gently remove them from the tray, taking care not to disturb the delicate roots. I use a small spoon to scoop each seedling and its surrounding soil, then transfer it to its own pot filled with the seed-starting mix. Press the soil lightly around the base to secure the plant.
Place the pots in a spot with full sun to partial shade (at least 4-6 hours of direct light daily). If growing indoors, supplement with a grow light kept 6 inches above the plants. Water the soil when the top inch feels dry, but avoid wetting the leaves to prevent fungal issues. Nasturtiums are drought-tolerant once established, but young plants appreciate consistent moisture.
☀️ Step 3: Acclimate and Transplant Outdoors After Frost
Wait until all danger of frost has passed in your area before moving nasturtiums outdoors. Harden them off by placing the pots in a sheltered spot for 1-2 hours the first day, gradually increasing exposure over 5-7 days. This helps them adjust to outdoor conditions without shock. Choose a location with full sun—nasturtiums thrive in warm, sunny spots and will produce more vibrant blooms and leaves.
Transplant the seedlings into the garden or containers with the potting mix, spacing them 12-18 inches apart to allow room for their trailing vines. If planting in containers, use 5-gallon pots for each plant to support their growth. Water deeply after transplanting to help the roots establish. Mulch around the base with 1 inch of mulch to retain moisture and suppress weeds, but keep it 2 inches away from the stems to prevent rot.
✂️ Step 4: Train Vines and Harvest for Edible Delights
As the vines grow, guide them along trellises, fences, or strings to encourage upward growth and make harvesting easier. Nasturtiums are self-clinging, but a little direction helps them reach their full potential. Pinch back the tips of young plants to encourage bushier growth and more flowers. This is especially useful if you're growing them for edible flowers and leaves, as it promotes a fuller harvest.
Harvest leaves and flowers as needed—young leaves have the most peppery flavor, while mature leaves and blooms are milder. Snip leaves with clean scissors just above a leaf node to encourage new growth. Flowers can be picked fresh for salads or dried for later use. Deadhead spent blooms to redirect the plant's energy into producing more flowers and leaves. With proper care, you'll enjoy a continuous harvest for 3-4 months once the plants are established.
Tips & tricks for perfect vining nasturtium growth
A few key strategies that'll help your vining nasturtiums thrive from seed to harvest.
Seed Starting Wisdom: The ¼-inch depth for sowing nasturtium seeds is crucial—these tiny seeds need just enough light to germinate without being buried too deep. I've found that using a toothpick to make precise holes in the sterile seed-starting mix gives you better control than simply pressing seeds into the soil. For even better results, consider using a seedling heating mat set to 75°F during germination—this can cut your 7-14 day wait time by 2-3 days.
Light Management: Nasturtiums are sun-lovers, but their young seedlings prefer bright, indirect light initially. If you notice leggy seedlings stretching toward the light, it's time to supplement with a grow light kept 6 inches above the plants. I rotate my trays daily to ensure even growth—this prevents them from leaning toward one light source and creates stockier plants ready for transplanting.
Transplanting Technique: When moving seedlings to 4-inch pots in Step 2, focus on preserving that delicate root system. I've ruined more than a few seedlings by pulling them out too quickly—always use a small spoon to lift the soil ball around the roots. After transplanting, give the soil a gentle press around the base to eliminate air pockets, which helps roots establish faster during the critical 1-2 hour acclimation period.
Harvesting Hack: For maximum peppery flavor, harvest young leaves in the morning after the dew has dried. Use clean scissors to snip just above a leaf node—this encourages bushier growth and more production. I've found that harvesting every 4-6 hours during peak growth (when plants are established) gives me a steady supply without stressing the plant. Deadheading spent blooms redirects energy to new flowers, extending your 3-4 month harvest window.
Pro Tips for Vining Nasturtium Seeds
- A few key strategies that'll help your vining nasturtiums thrive from seed to harvest.
- Seed Starting Wisdom: The ¼-inch depth for sowing nasturtium seeds is crucial—these tiny seeds need just enough light to germinate without being buried too deep.
- Light Management: Nasturtiums are sun-lovers, but their young seedlings prefer bright, indirect light initially.
Frequently asked questions
Got questions about growing vining nasturtium seeds? Here are some of the most common ones—and their answers—to help you get started on your edible garden adventure!
How long does it take for vining nasturtium seeds to germinate?
Vining nasturtium seeds typically germinate in 7 to 14 days, depending on temperature and moisture. Keep the soil consistently moist (but not soggy) and place the pot in a warm, sunny spot to speed up the process. If germination takes longer, try gently pressing the seeds into the soil—they need light to sprout!
Can I grow vining nasturtiums from store-bought seeds?
Store-bought nasturtium seeds are perfectly safe and edible. Look for organic or heirloom varieties for the best flavor. Just make sure they’re labeled as Tropaeolum majus (the edible species) and avoid treated seeds, which may not grow as well.
How fast do vining nasturtiums grow?
These fast growers can climb 8 to 10 feet in a single season! With proper care, you’ll see sprouts in 1–2 weeks, flowers in 3–4 weeks, and edible leaves and blooms in just 6–8 weeks. They’re one of the quickest edible plants to harvest!
What if my nasturtium seeds don’t sprout?
Don’t worry—try these fixes:
- Check moisture: Seeds need consistent dampness (not waterlogged soil).
- Test depth: Nasturtium seeds need light to germinate—press them lightly into soil (¼ inch max).
- Warmth matters: Ideal temps are 60–70°F. Use a heat mat if your space is chilly.
- Fresh seeds: Older seeds (over 1 year) may lose viability. Start with new ones!
Can I save seeds from my nasturtium flowers?
Yes! After flowering, let a few blooms fade into seed pods. Once the pods turn brown and papery, gently squeeze them to release the orange or black seeds. Store them in a cool, dry place for up to 2 years. Just remember—seeds from hybrid varieties may not grow true to type.
Wrapping up and next steps
Growing vining nasturtium seeds is a rewarding journey—packed with flavor, beauty, and ease! Whether you’re harvesting peppery leaves, vibrant blooms, or even saving seeds for next season, these hardy plants deliver fast results with minimal fuss. 🌱
Ready to dive in? Start by planting your first batch today—your garden (and taste buds) will thank you! For extra inspiration, explore creative ways to use your harvest, like nasturtium-infused oils or edible garnishes. Happy growing!