
Propagation
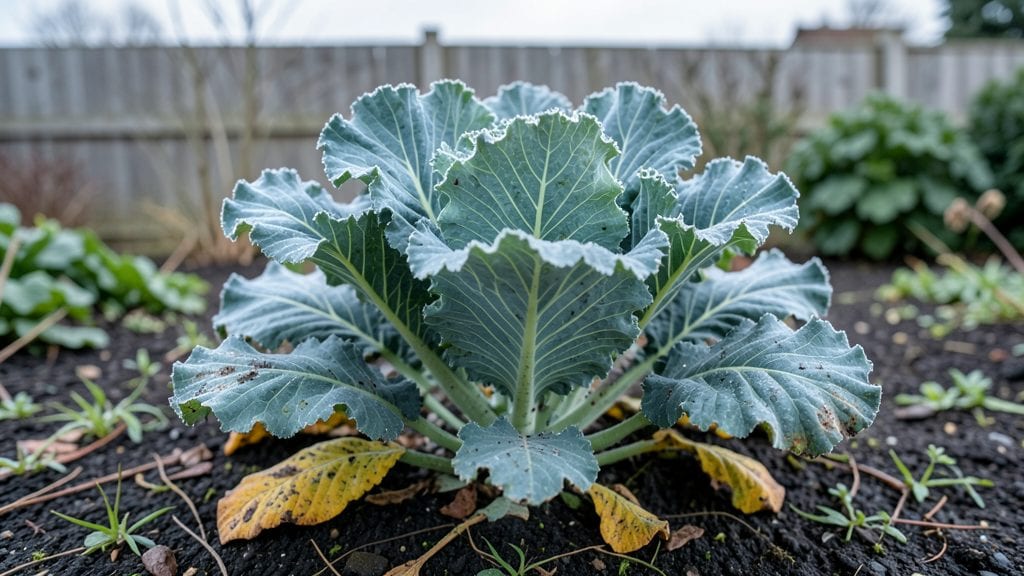
Planting Winterbor kale seeds in early fall gives you the jump on a cold-hardy harvest that keeps producing through winter’s chill. 🌱 I’ve grown this variety for three winters straight—it’s the only kale that actually thrives when temperatures dip, sending out sweet, tender leaves even after frost.
The secret lies in timing: direct-sow seeds 6-8 weeks before your first frost, and you’ll have baby plants ready to weather snowflakes.
This kale doesn’t need fancy soil—just well-draining, slightly acidic dirt with compost mixed in. In colder zones (5-7), mulch heavily after planting to protect roots, while milder climates (8+) can leave it exposed for year-round harvests.
The key is patience: Winterbor matures slower than spring kale but rewards you with bold, blue-green leaves that stay crisp even in January.
You’ll harvest continuously from late fall through spring, with leaves tasting sweeter after frost. Cut outer stems first to encourage regrowth, and avoid over-fertilizing—Winterbor prefers lean soil.
In my zone 6 garden, I’ve pulled fresh greens straight from the snowbank for winter soups, proving this variety lives up to its reputation.
Works in containers too—just use 12-inch-deep pots for small-space growing. For best results, succession-sow every 3 weeks in fall. The payoff? Kale that outlasts every other variety, with minimal effort. Here’s how to make it work in your climate.
📚 In This Guide
- What you need
- Instructions
- Tips and common mistakes
- Wrapping up and next steps
What you need
- ● Winterbor Kale Seeds – 1 packet (approx. 50-100 seeds) or enough for your desired planting area.
- ● Well-draining soil – A mix of 50% potting soil and 50% compost (or garden soil with added compost for in-ground planting).
- ● Containers or garden bed – For container gardening: 5-gallon pots or larger (at least 12" deep) with drainage holes.
- ● For in-ground planting: A sunny spot with 6+ hours of light and loose, fertile soil.
- ● Watering can or hose with a gentle spray nozzle.
- ○ Organic fertilizer (optional but recommended) – Balanced 10-10-10 or compost tea for nutrient boost.
- ● Garden gloves – To keep hands clean and protected.
- ● Trowel or transplanting tool – For digging and spacing seeds.
- ● Row cover or frost cloth – For early/late season protection in colder climates.
- ● Mulch (straw or leaves) – To insulate roots during freezing temps.
- ● pH test kit – Ideal soil pH: 6.0–7.0 (kale loves slightly acidic to neutral soil).
- ● Seedling heat mat – If starting indoors in cooler months.
Step-by-step guide to growing Winterbor kale from seed
This cold-hardy variety thrives in cool weather—here’s how to coax robust, flavorful leaves all season.
🌱 Step 1: Start Seeds Indoors or Direct-Sow in Cool Soil
Winterbor kale handles frost beautifully, so you can direct-sow seeds 4-6 weeks before your first frost or start them indoors 6-8 weeks before transplanting. I like to sow directly in the garden because seedlings establish quickly in cool soil. Use your finger to press seeds ½ inch deep in well-drained soil, spacing them 12-18 inches apart.
Keep the soil consistently moist until germination, which takes 7-14 days in cool conditions. If starting indoors, use seed-starting mix and a humidity dome to retain moisture. Thin seedlings to 12 inches apart once they have 2-3 true leaves—this prevents overcrowding and encourages strong stems.
☀️ Step 2: Provide Sun and Protect from Pests
Winterbor kale thrives in full sun to partial shade, with at least 4-6 hours of sunlight daily. In hot summer months, afternoon shade helps prevent bolting. I’ve found that a light row cover or shade cloth works wonders if temperatures climb above 80°F.
Watch for pests like cabbage worms and aphids, which love young kale. I spray plants with a mix of 1 tablespoon neem oil per quart of water every 7-10 days as a preventive measure. You’ll notice healthier leaves and fewer holes if pests are kept in check early.
💧 Step 3: Water and Fertilize for Continuous Growth
Keep the soil evenly moist but not soggy—kale roots rot easily in waterlogged conditions. Water at the base of plants in the morning to allow foliage to dry before nightfall, reducing disease risk. Mulch with 2-3 inches of straw or shredded leaves to retain moisture and suppress weeds.
Feed plants with a balanced organic fertilizer (10-10-10) every 4-6 weeks during the growing season. I like to side-dress with compost mid-season for an extra nutrient boost. You’ll see new leaves emerging within a week of fertilizing—this is your sign the plants are thriving.
✂️ Step 4: Harvest Leaves for Flavorful Yields
Start harvesting outer leaves when they reach 6-8 inches tall, leaving the inner leaves to keep growing. Use clean scissors or your fingers to snip leaves at the base. Regular harvesting encourages bushier growth and prevents bolting in warm weather.
Winterbor kale tastes sweeter after light frosts, so don’t rush to harvest in fall. You can also cut entire plants down to 2 inches above the soil in late fall, leaving them to overwinter. New growth will emerge in spring, giving you a second harvest.
Tips & tricks for perfect Winterbor kale growth
These practical insights will help you grow the hardiest, most flavorful Winterbor kale possible—no green thumb required.
Timing is Everything: The 4-6 weeks before your first frost window is your golden opportunity for direct sowing. If you're unsure about your frost dates, check your local weather service or use a frost calendar—this variety won't tolerate summer heat, so timing is critical. I've found that planting in late summer gives you a head start before winter sets in, and you'll have tender leaves ready for fall harvests.
Germination Secrets: Those 7-14 days until germination can feel like forever, but consistency is key. I keep a spray bottle handy to mist seeds daily rather than watering heavily, which prevents washing them away. Pro tip: Place a humidity dome over indoor starts or use clear plastic wrap over outdoor rows until sprouts appear—this creates a mini greenhouse effect that speeds up germination.
Pest Prevention: The 7-10 day neem oil schedule is non-negotiable for me. I mix it in a spray bottle and apply it in the early morning so the oil has time to work before pests become active. For extra protection, I interplant with flowers like nasturtiums—they naturally repel cabbage worms while adding beauty to your garden. The first sign of pests is tiny holes in leaves, so check regularly!
Harvesting Wisdom: When harvesting those 6-8 inch leaves, I always leave the central growing point intact. This encourages continuous production throughout the season. In late fall, I cut plants down to 2 inches and let them overwinter—they'll reward you with fresh growth in spring. The leaves actually sweeten after light frosts, so don't be afraid to harvest even when temperatures dip!
Pro Tips for Winterbor Kale Seeds
- These practical insights will help you grow the hardiest, most flavorful Winterbor kale possible—no green thumb required.
- Timing is Everything: The 4-6 weeks before your first frost window is your golden opportunity for direct sowing.
- Germination Secrets: Those 7-14 days until germination can feel like forever, but consistency is key.
Frequently asked questions
Got questions about growing Winterbor kale? You’re not alone!
Here are answers to the most common queries about this cold-hardy superstar—from planting tips to troubleshooting. Let’s dive in!
When is the best time to plant Winterbor kale seeds?
Winterbor kale thrives in cool weather, so plant seeds 4–6 weeks before your first frost for a fall harvest, or directly in late summer for overwintering. In mild climates, you can even sow seeds in early spring or late winter. Just ensure soil temps stay above 40°F (4°C)—it’s frost-tolerant but won’t germinate in cold soil.
Can Winterbor kale survive winter?
This variety is one of the hardiest kales, handling light frosts down to 15°F (-9°C). For extra protection, mulch with straw or row covers. If snow blankets your garden, it’s like a natural blanket—just brush it off occasionally to prevent rot.
What’s the difference between Winterbor and other kale varieties?
Winterbor stands out for its extra cold tolerance and sweet, tender leaves even after frost. Unlike curly kales (e.g., ‘Lacinato’), its flat, blue-green leaves stay palatable longer. It’s also bolting-resistant, meaning it won’t go to seed prematurely in heat—perfect for extended harvests!
Do I need to fertilize Winterbor kale seeds?
Start with well-composted soil (pH 6.0–7.0). While kale isn’t heavy-feeder, a balanced organic fertilizer (like 5-5-5) at planting and a nitrogen boost mid-season (e.g., fish emulsion) promotes lush growth. Avoid over-fertilizing—too much nitrogen can make leaves bitter.
What pests or diseases should I watch for?
Winterbor is resilient, but keep an eye out for cabbage worms (handpick or use BT spray) and aphids (blast off with water). For disease prevention, rotate crops and ensure good airflow. If leaves yellow, check for clubroot (a soil-borne fungus)—amend soil with lime if needed.
Can I save seeds from Winterbor kale?
Yes! Let a few plants bolt (flower) in late spring, then harvest seeds from the pods as they dry. Store them in a cool, dark place for up to 3 years. Pro tip: Cross-pollination is rare, but isolate plants by 500+ feet for purity if saving seeds for sale.
How do I harvest Winterbor kale for the best flavor?
Harvest outer leaves first, leaving the center to regrow. For sweetest flavor, pick after a light frost—cold converts starches to sugars! Use clean scissors or your hands, and avoid tearing leaves. Bonus: Massage leaves with a pinch of salt or olive oil to enhance flavor.
Wrapping up and next steps
Growing Winterbor kale seeds is your ticket to a thriving, cold-hardy garden that keeps giving long after other crops have bowed out! Whether you're a seasoned gardener or just starting, this resilient variety proves that winter harvests can be just as rewarding—packed with nutrition and flavor. 🥬❄️
Ready to take the next step? Start by ordering your Winterbor seeds and mark your calendar for an early planting session—your future self (and taste buds) will thank you! For extra inspiration, explore companion planting tips or preservation methods to make the most of your bounty.